DIY Automated Christmas Tree Watering
🗓️ • ⏱️ 9 min read
🗓️ • ⏱️ 9 min read
I’m notoriously bad at watering the Christmas tree we bring into our house every year. I diligently water it for the first few days. Then I forget or get busy; a day or two goes by where I don’t water it, and the tree eventually dries out. By the time Christmas comes around, the tree is hanging on for dear life. Plus, even when I remember, getting under the tree is awkward, and I always spill water everywhere. A couple of years ago, I bought a long funnel, thinking that would make things easier, but it ended up being just as annoying and messy as not using one.
Amazon sells both cheap siphoning and expensive pumping tree watering systems. The one I like the most is $100. It’s not necessarily a bad price if it lasts multiple years. However, thinking about how it works, I decided to try building something myself.
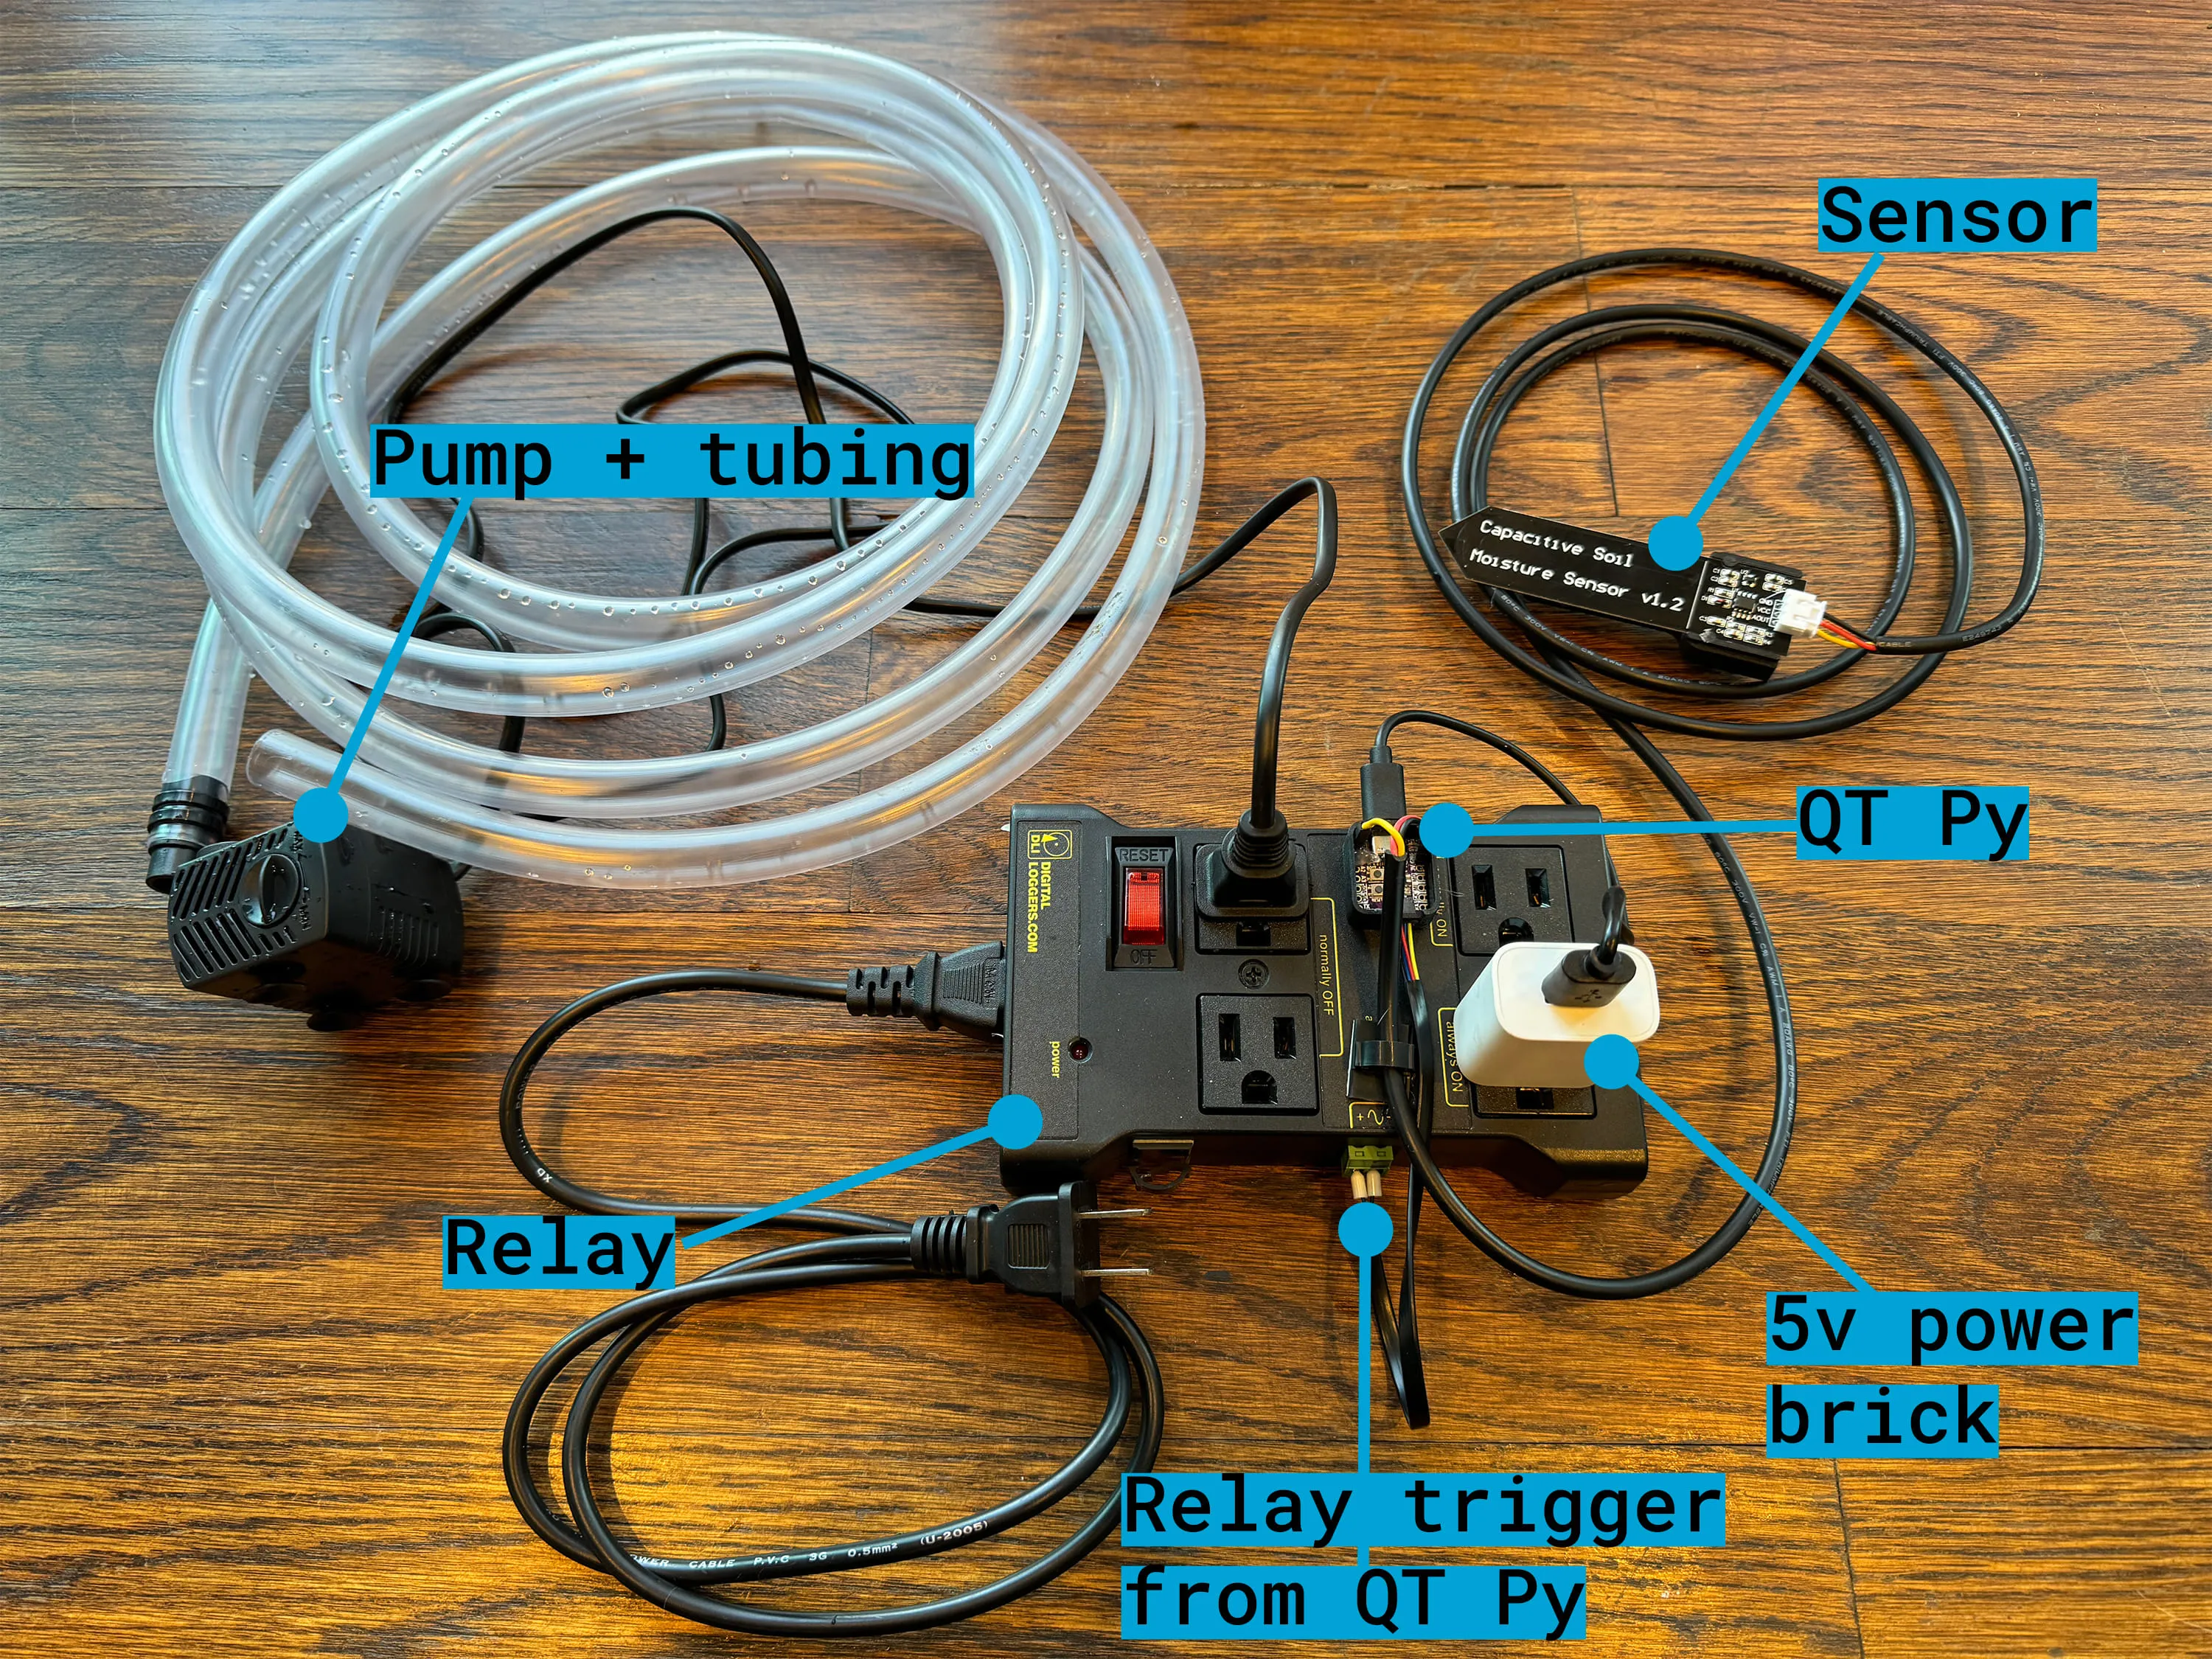
I used an Adafruit QT Py ESP32-C3 board, a capacitive moisture sensor, a cheap fountain pump, and a relay to create a self-watering system that wirelessly connects to my existing Home Assistant setup. All for about $20, not including parts and tools I already owned.
I know what you’re thinking…
Do you really need your Christmas tree water pump to wirelessly connect to your home network?
No, absolutely not. But I had an ESP-32 board on hand, and, as you’ll see, ESPHome made it incredibly easy to configure the microcontroller and set up the watering automation.
Total: $62.36
I already had the QT Py ESP32-C3 and power relay from previous projects, so my total cost was only $22.46.
The relay I’m using has four outlets on it and probably wouldn’t be my first option if I didn’t already have it as I’m only using two of the outlets and only need the one switched outlet.
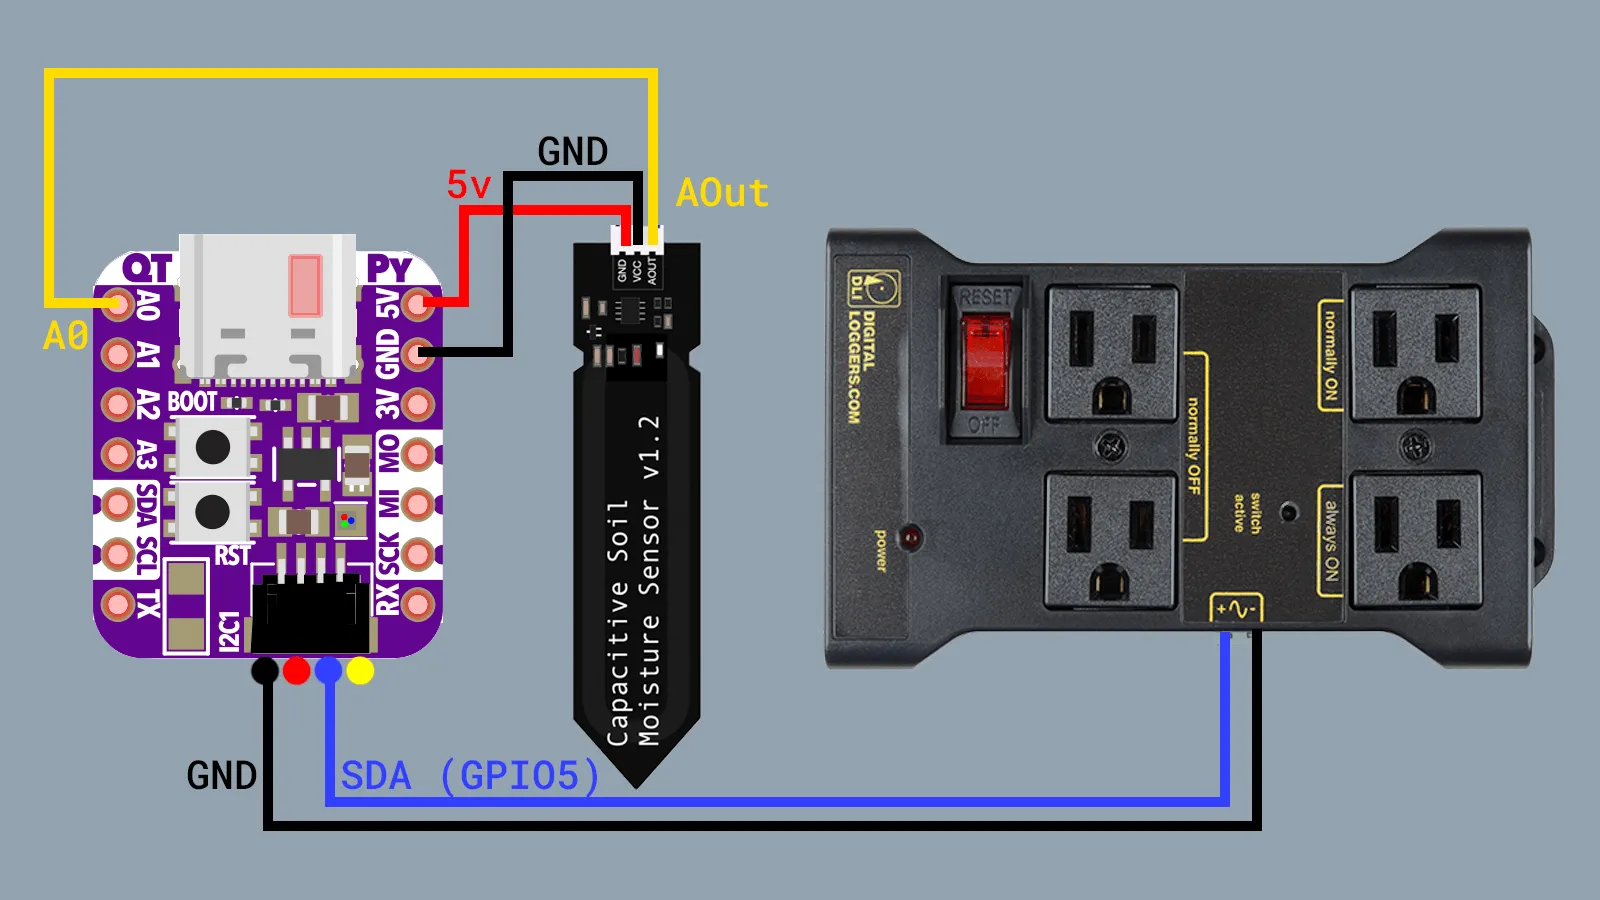
The capacitive moisture sensor gets power from the QT Py via the 5v and GND pins and sends its analog signal to the A0 pin.
The QT Py connects to the relay via its STEMMA QT connector. The connector has four pins, the GND and GPIO 5 pins are used. When the QT Py sends a 3v signal over the GPIO 5 pin, the relay switches the “normally OFF” outlet on.
The QT Py plugs into the “always ON” outlet via a USB C cable and 5v power brick for constant power.
The pump plugs into the “normally OFF” outlet, which, as the name states, is normally off until a 3v signal provided by the microcontroller is detected, and then it switches on.
I’m going to skip over the instructions on setting up a device with ESPHome as there are a ton of tutorials and the ESPHome docs that cover those steps in great detail. I have ESPHome running as part of my local Home Assitant instance and used that to compile the following config and flash it onto the QT Py.
esphome:  name: esphome-qtpy-c3-xmas-tree  friendly_name: esphome-qtpy-c3-xmas-tree
esp32:  board: esp32-c3-devkitm-1  framework:    type: arduino
# Enable Home Assistant APIapi:  encryption:    key: ""
ota:  password: ""
wifi:  ssid: !secret wifi_ssid  password: !secret wifi_password
# Virtual Switch for controlling the pumpswitch:  - platform: gpio    pin: GPIO5 # SDA    name: "Tree Pump"    id: xmas_tree_pump    restore_mode: ALWAYS_OFF    icon: "mdi:water-pump"
# Capacitive Moisture Sensor# Dry: 2.2V; Fully Submerged: 1.0Vsensor:  - platform: adc # ESPHome Analog To Digital Sensor    pin: A0 # A0 pin on the QT Py    name: "Christmas Tree Water Sensor"    id: xmas_tree_water_sensor    icon: "mdi:pine-tree"    update_interval: 1s # Update status every second    attenuation: auto    unit_of_measurement: "%" # Default unit for adc is volts    filters:    - median:        window_size: 3 # Combine 3 values        send_every: 3 # Find and send the median after 3 values    - calibrate_linear: # More on callibration below        - 2.20 -> 61.54        - 1.00 -> 100.00    - lambda: | # Only return values between 0 and 100        if (x < 0) return 0;        else if (x > 100) return 100;        else return (x);    accuracy_decimals: 0    on_value_range: # When water is below bottom of sensor      - below: 62        then:          - switch.turn_on: xmas_tree_pump  # Turn on the pump          - wait_until: # Wait until the sensor is above 90% or 10 seconds has passed              condition:                sensor.in_range:                  id: xmas_tree_water_sensor                  above: 90              timeout: 10s          - switch.turn_off: xmas_tree_pump # Turn off pump
The config defines two devices. The first is a virtual switch with the id xmas_tree_pump that sends a 3v signal over the GPIO 5 pin when switched on.
The second device is a sensor with the id xmas_tree_water_sensor using the adc or Analog to Digital platform that reads its data from the A0 pin. The time between updates is set to 1 second, and the unit of measurement is changed from volts to percentage.
Filters are applied to refine the incoming data by calculating the median, setting upper and lower limits, and calibrating to a scale, which I will write about below. Documentation for all the sections of the config I used is linked here.
on_value_range: # When water is below bottom of sensor - below: 62 then: - switch.turn_on: xmas_tree_pump # Turn on the pump - wait_until: # Wait until the sensor is above 90% or 10 seconds has passed condition: sensor.in_range: id: xmas_tree_water_sensor above: 90 timeout: 10s # - delay: 5s - switch.turn_off: xmas_tree_pump # Turn off pumpWhen the value of the sensor drops below 62%, turn on the xmas_tree_pump switch. Wait until the sensor is either above 90% or 10 seconds have passed, then turn the xmas_tree_pump switch off.
Before completing the filters and automation sections of the config I did some initial testing to determine the voltage values at different water levels on the sensor. As you might have read in the config comments, it measured 2.2v when the sensor was dry and 1.0v when fully submerged in water.
The height of the cylinder of my tree stand is 6.5 inches (16.5 cm). With the components of the moisture sensor above the water line, the measurable area of the sensor is about 2.5 inches (6.35cm) tall. The bottom of the sensor sits about 4 inches (10 cm) above the bottom of the cylinder.
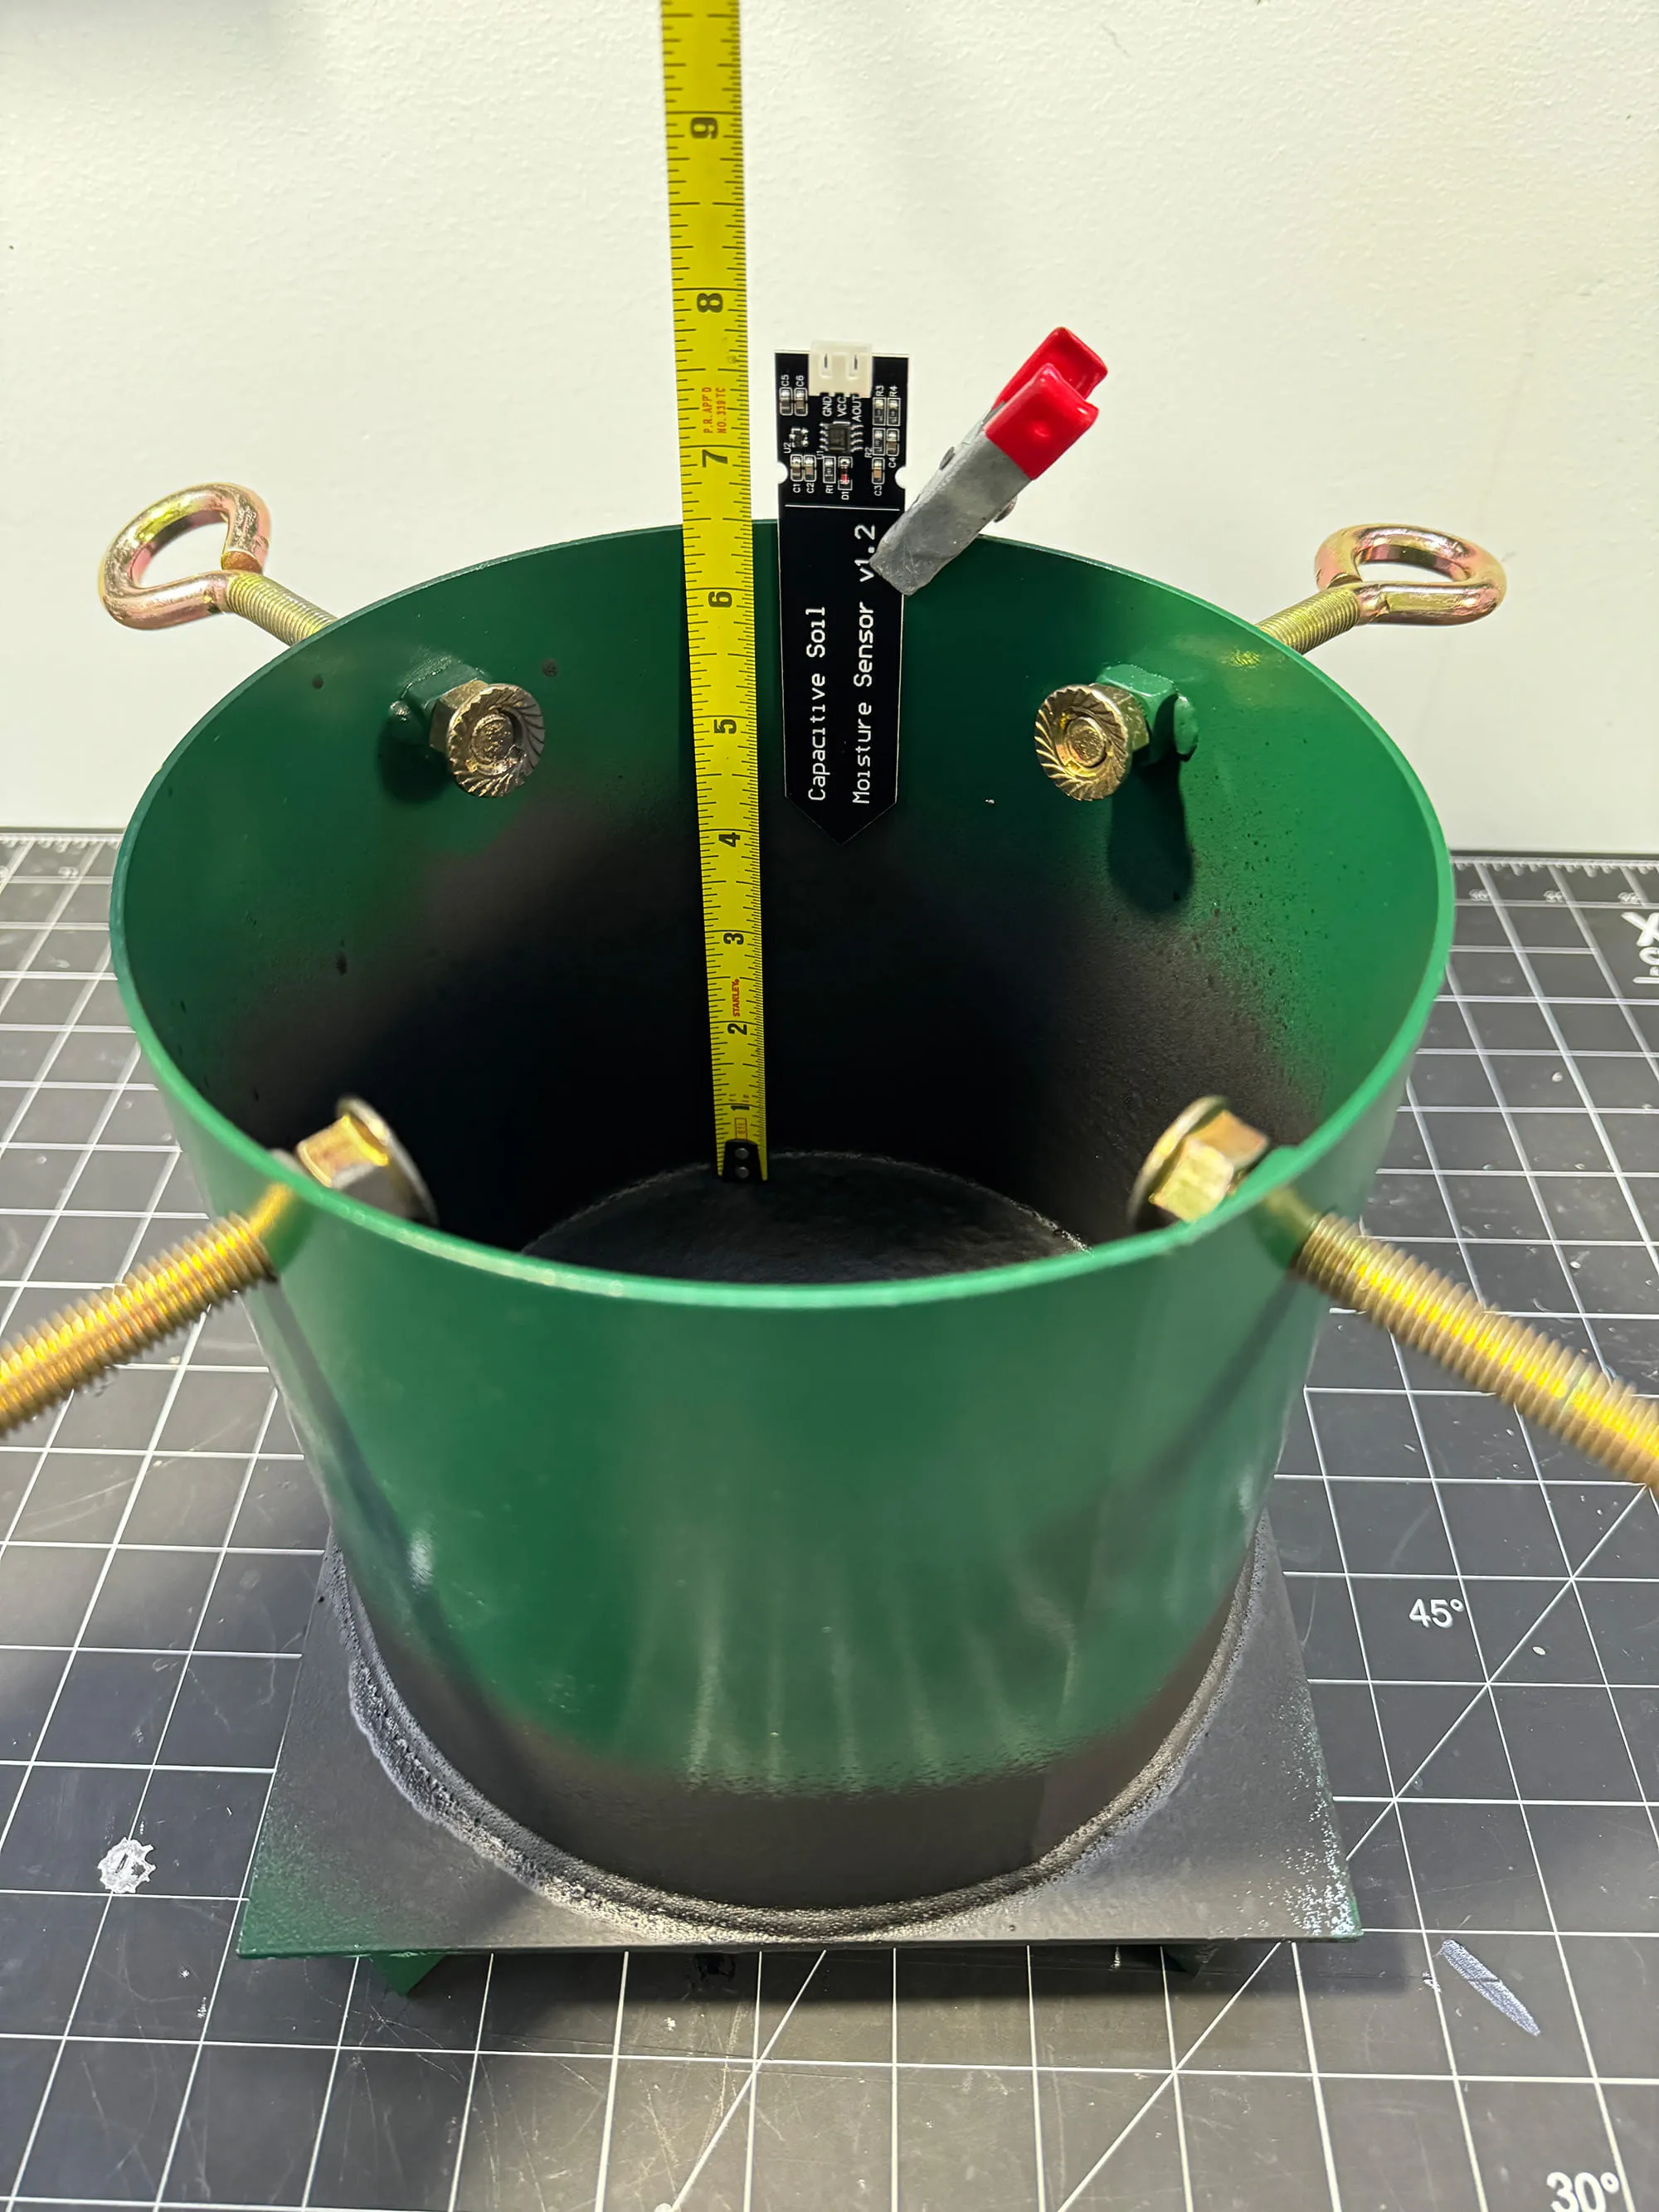
Doing some simple cross-multiplication, I figured out that when the water is at the bottom of the sensor (4 inches from the bottom of the cylinder), the cylinder is 62% full.
And we can map those values to the voltage readings from above.
| Water Height | Fill Percentage | Voltage Reading |
|---|---|---|
| 6.5in (16.5cm) | 100% | 1.00 volts |
| 4in (10cm) | 62% | 2.20 volts |
| 0in (0cm) | 0% | - |
Those values can be provided to the calibrate_linear filter in the config. Since the sensor doesn’t reach the bottom of the cylinder, there’s no way of knowing what the water level is if it’s below the sensor, but that shouldn’t matter as the automation starts pumping water once the water level falls below 62%, which is below the bottom of the sensor.
- calibrate_linear: - 2.20 -> 61.54 - 1.00 -> 100.00I needed a way to mount the moisture sensor to the tree stand, so I turned to my ever-growing CAD and 3D printing skills. The requirements were simple:
This is what I came up with. The sensor friction fits into the print. I added a dab of hot glue to ensure it stays in place. I had some small magnets lying around, and the tree holder is metal, so it securely grabs the stand. You can download, print, and modify the model yourself on Printables.com.
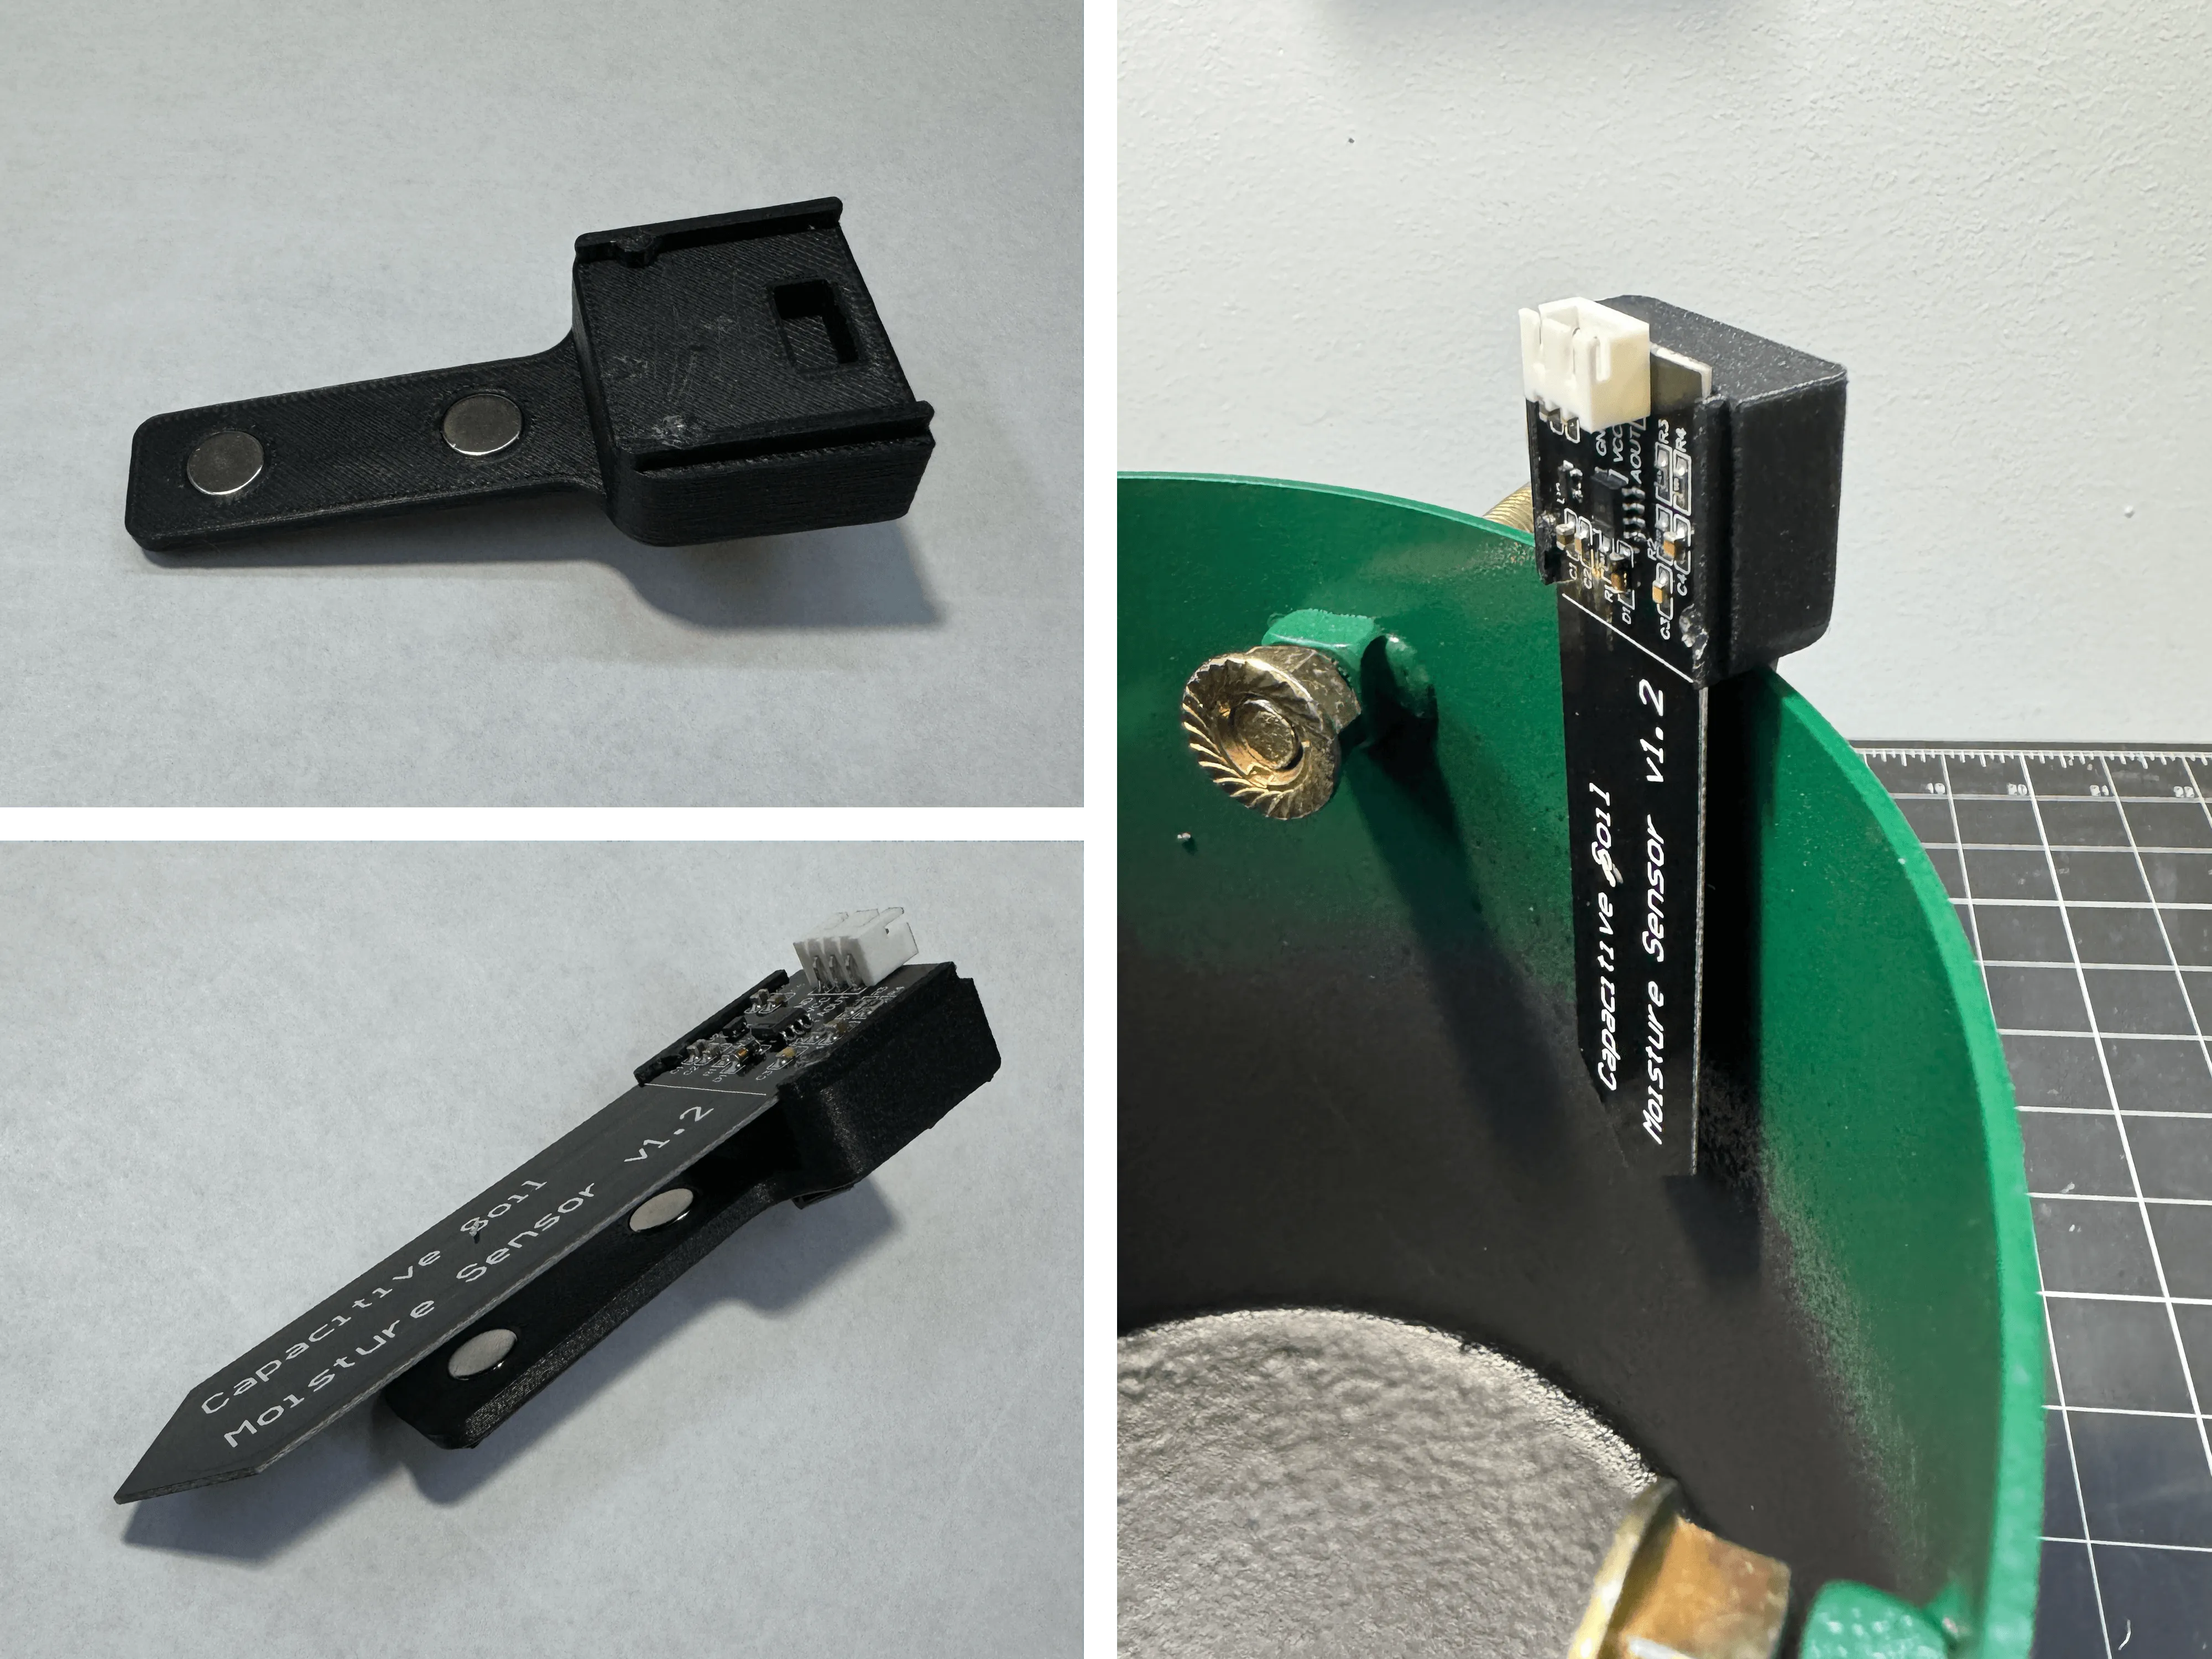
The other 3D print is a simple case for the QT Py that someone else designed and uploaded to Printables.
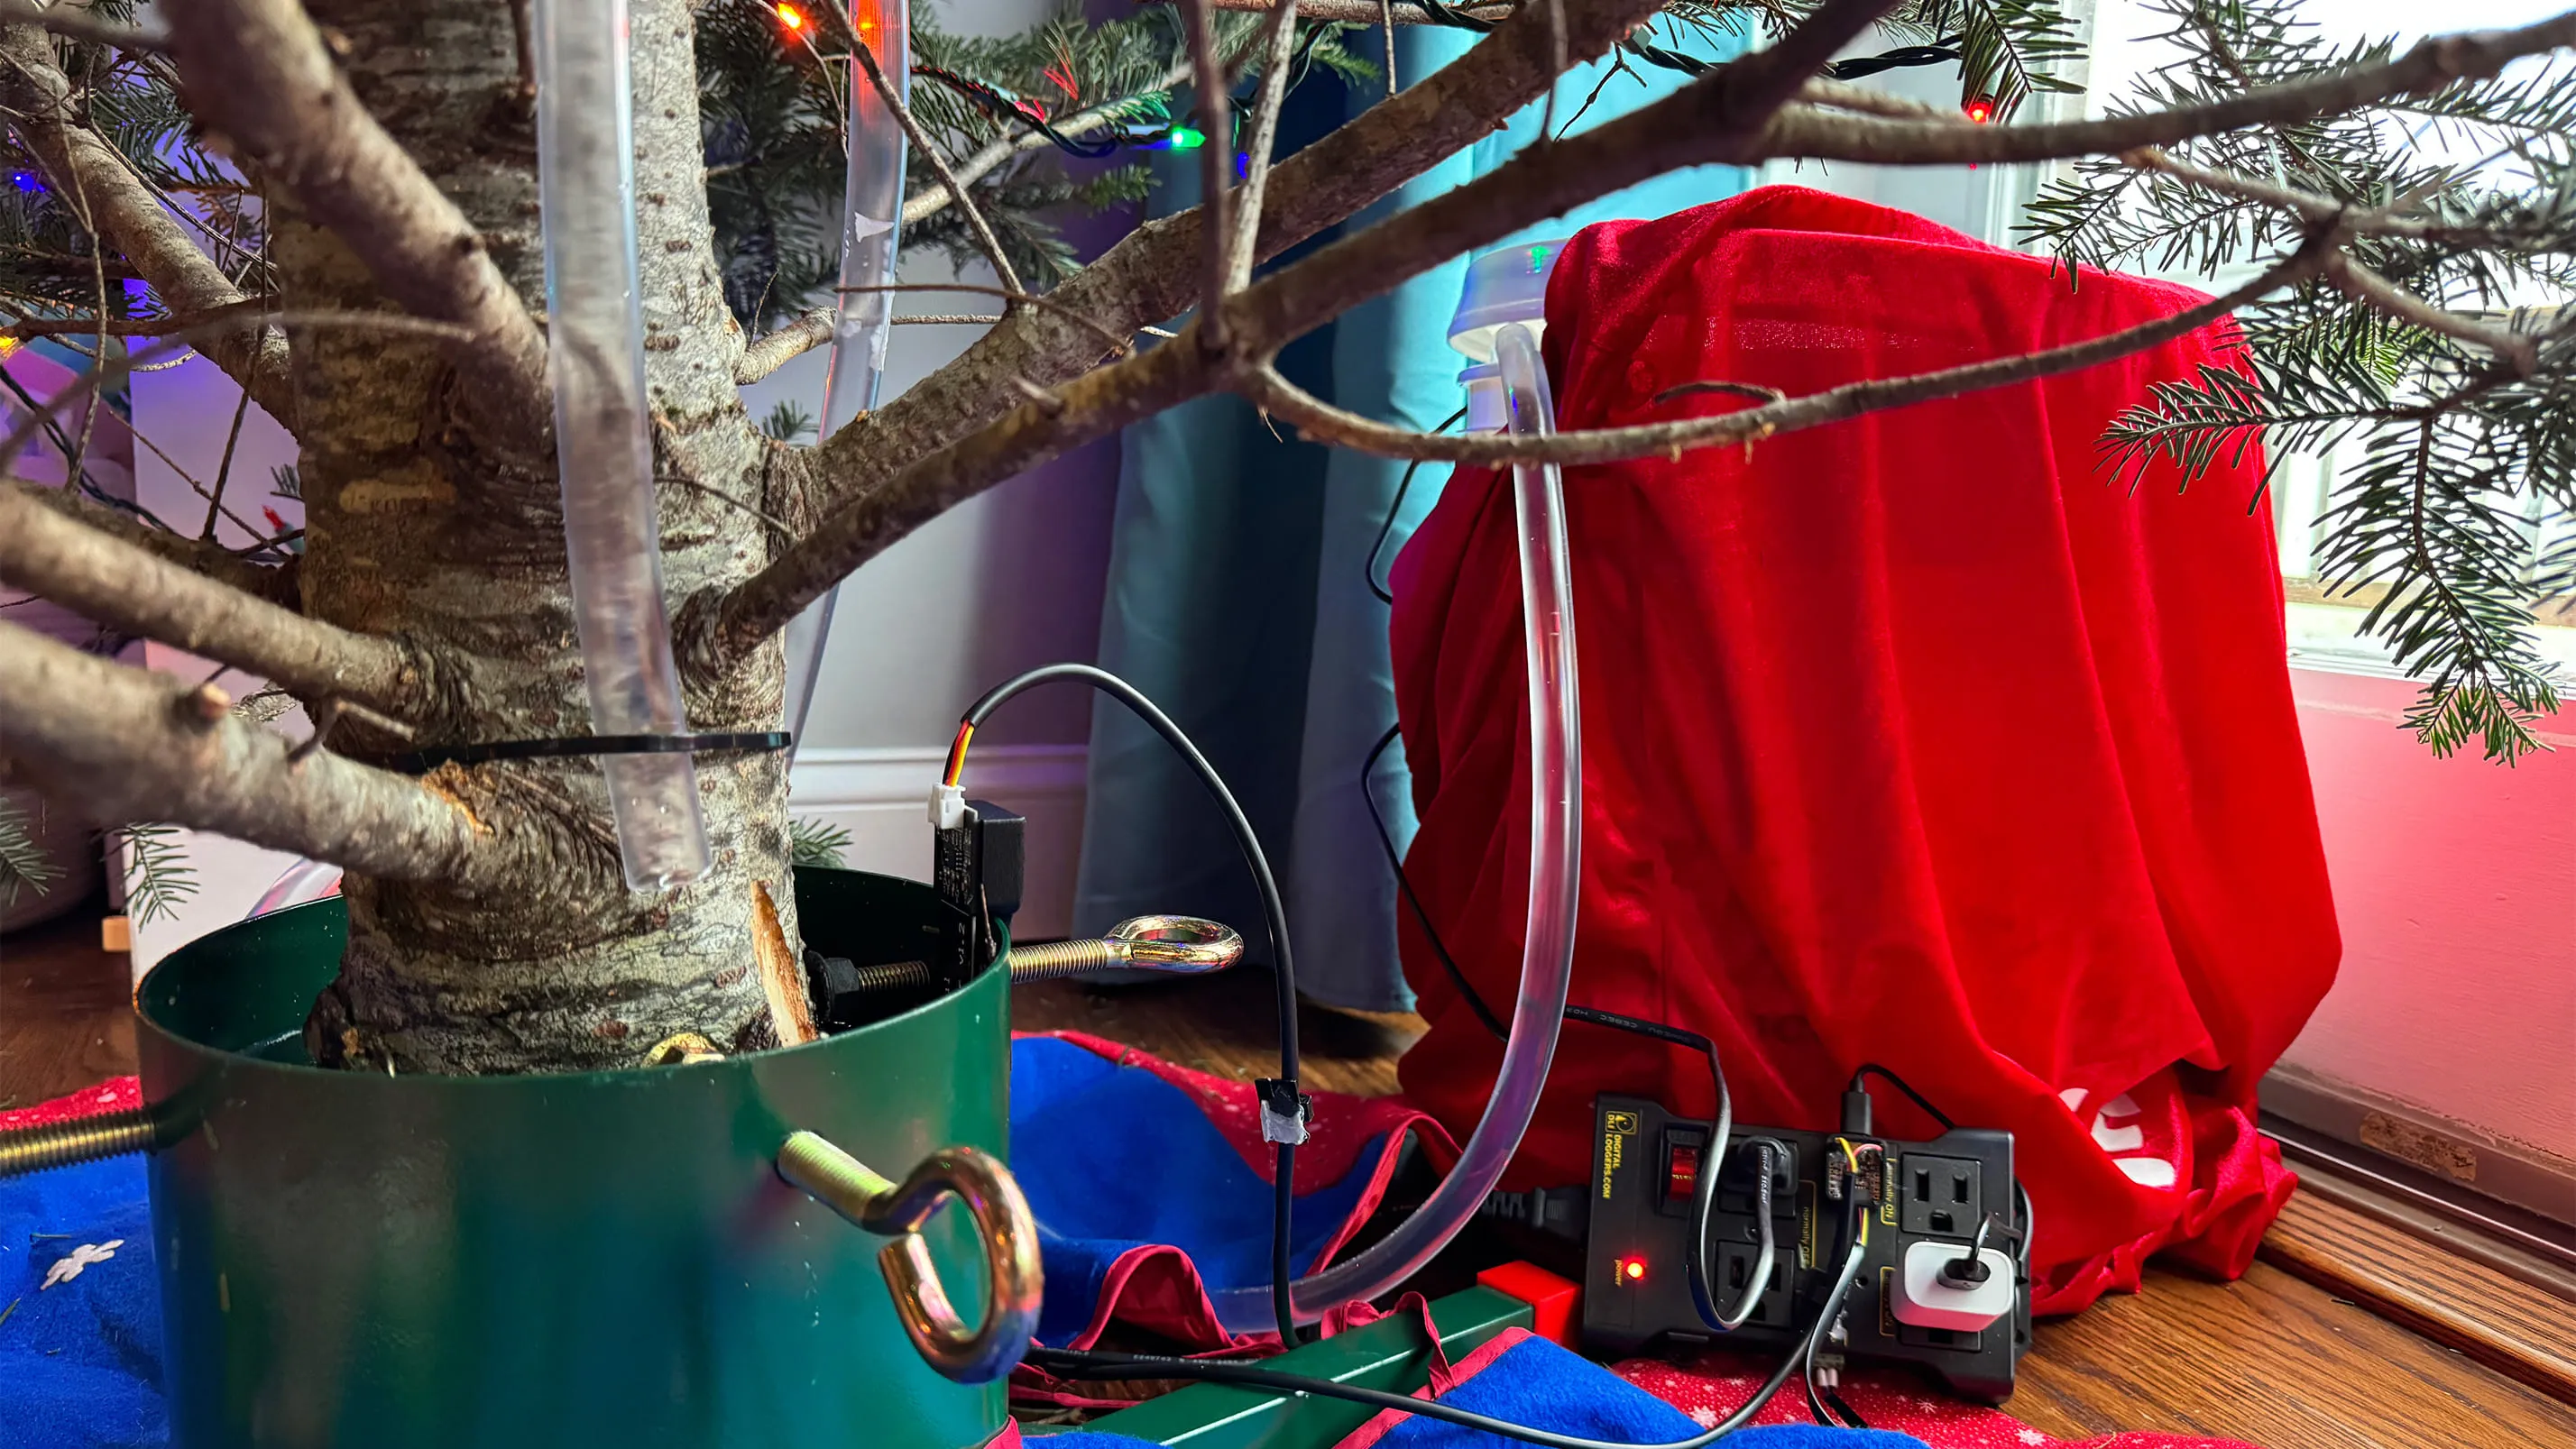
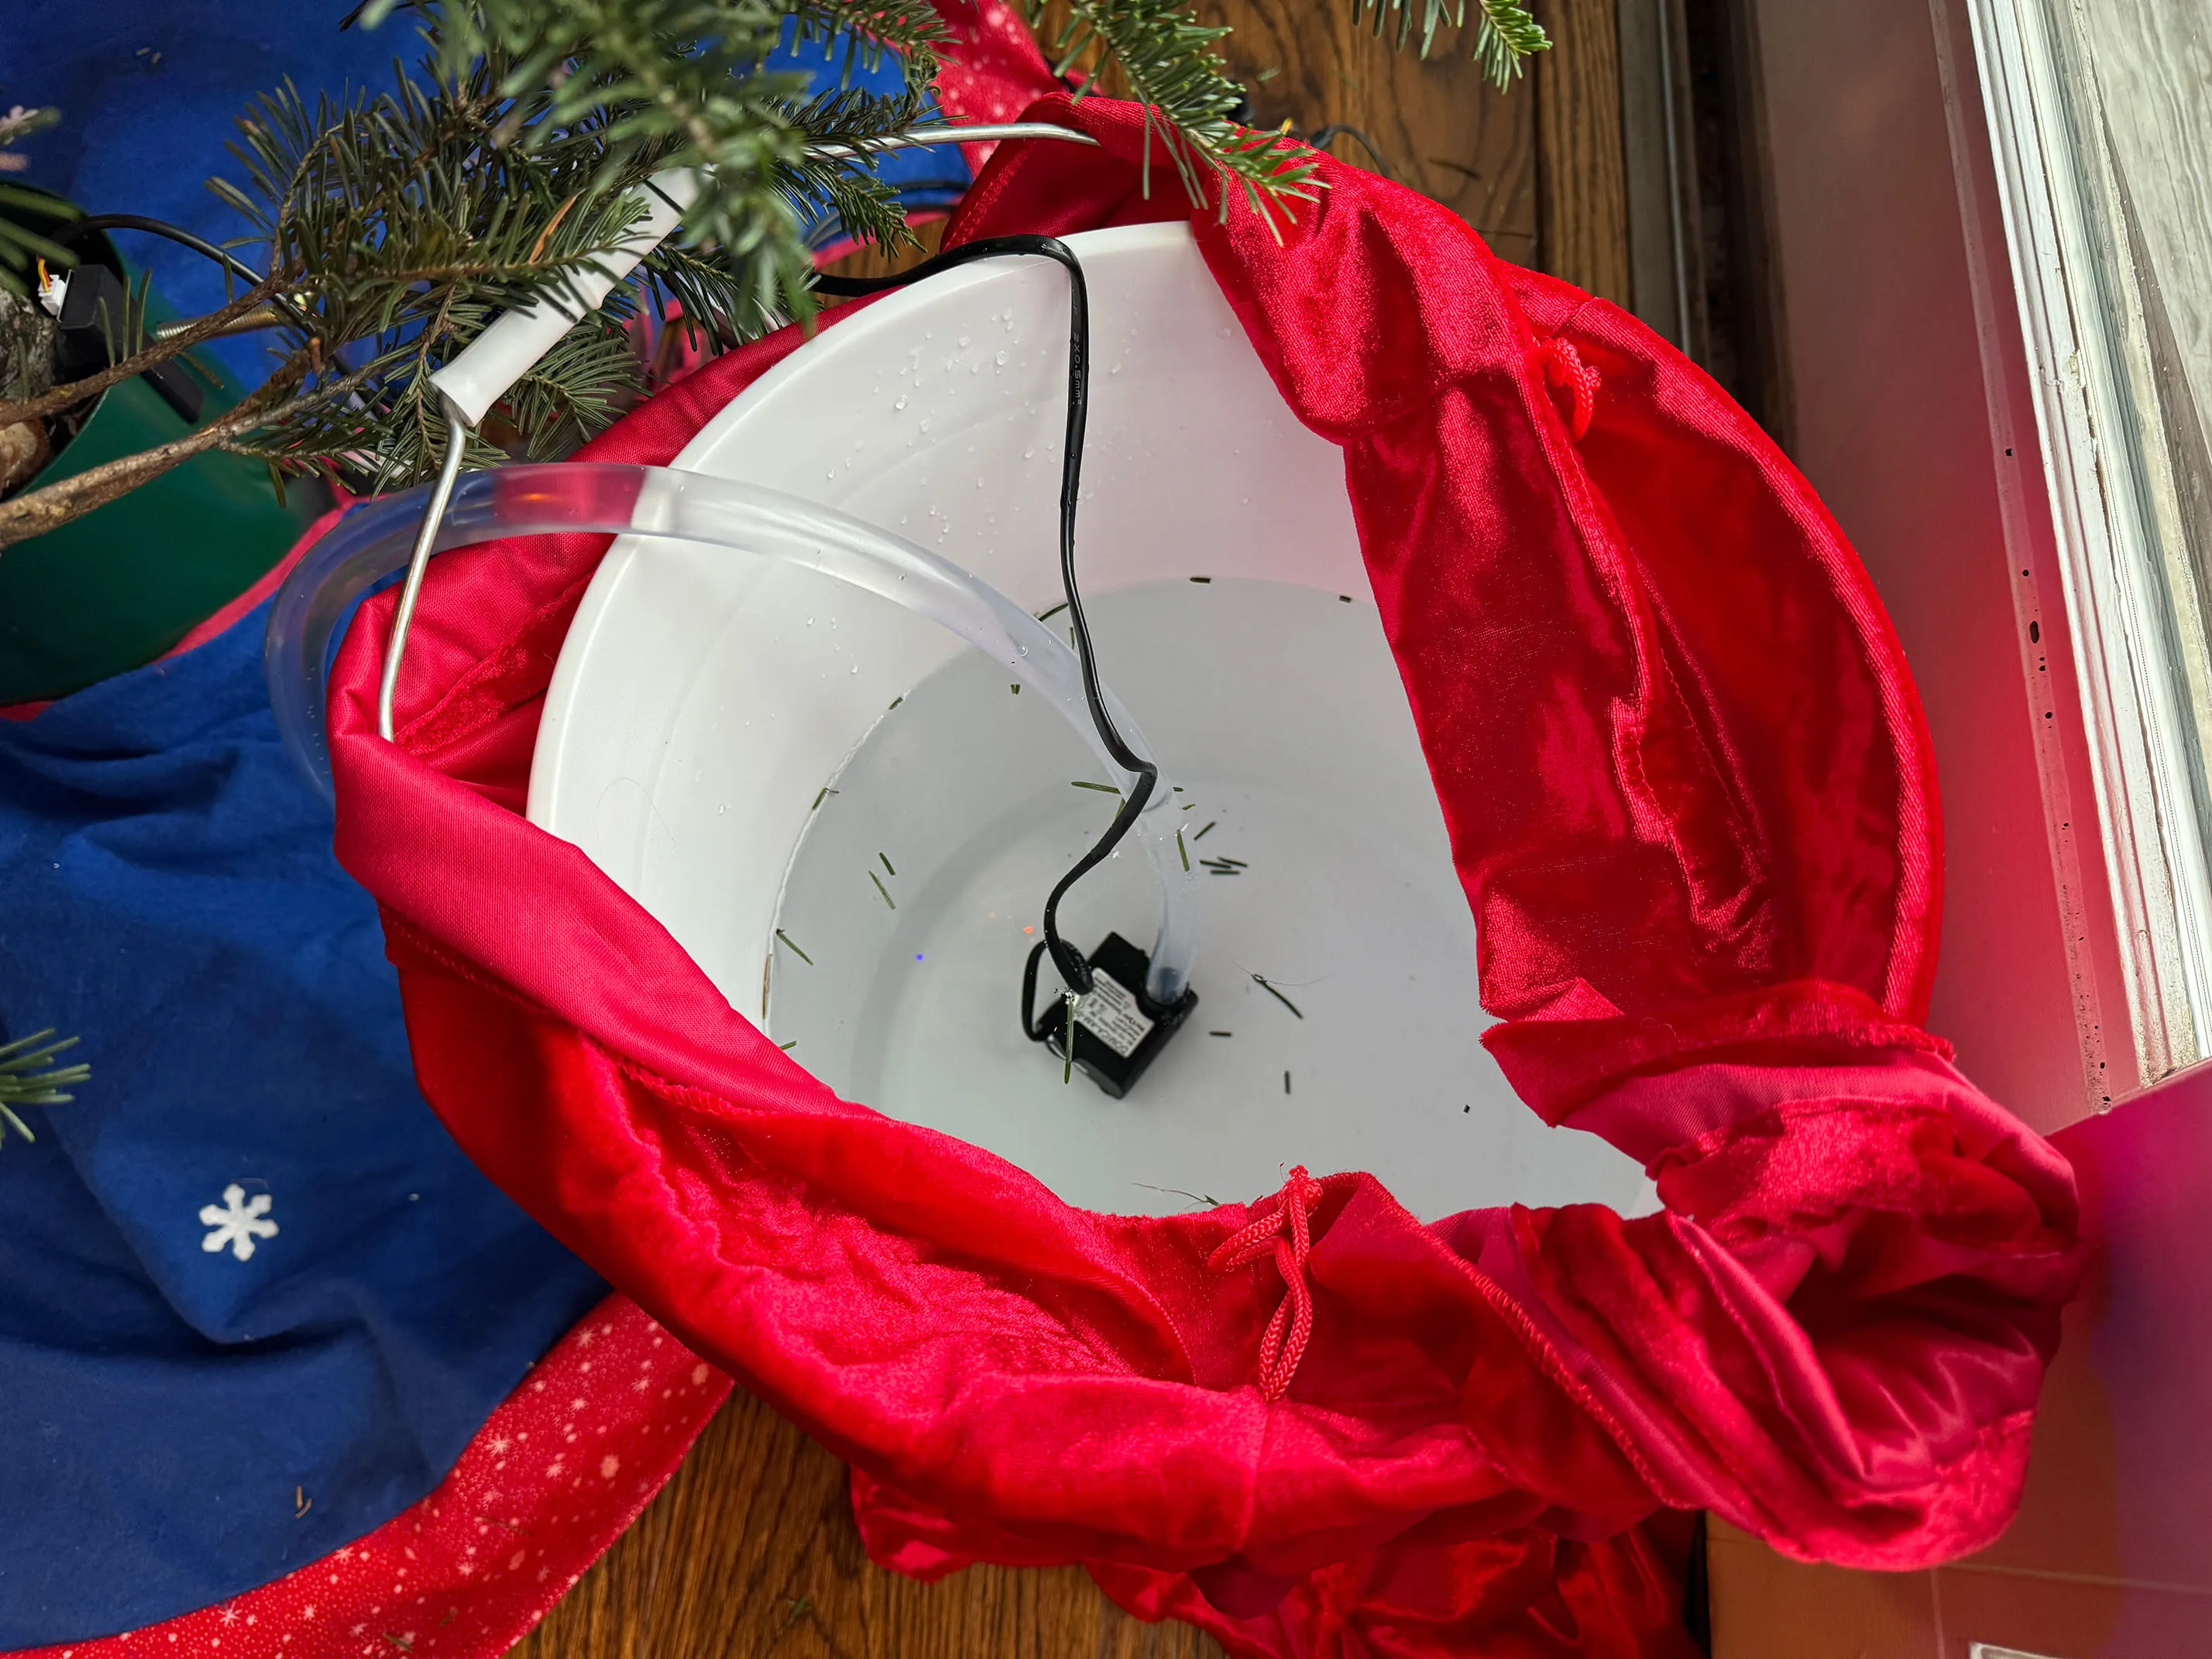
The pump goes into the bucket, and the bucket goes into Santa’s toy bag to disguise it under the tree.
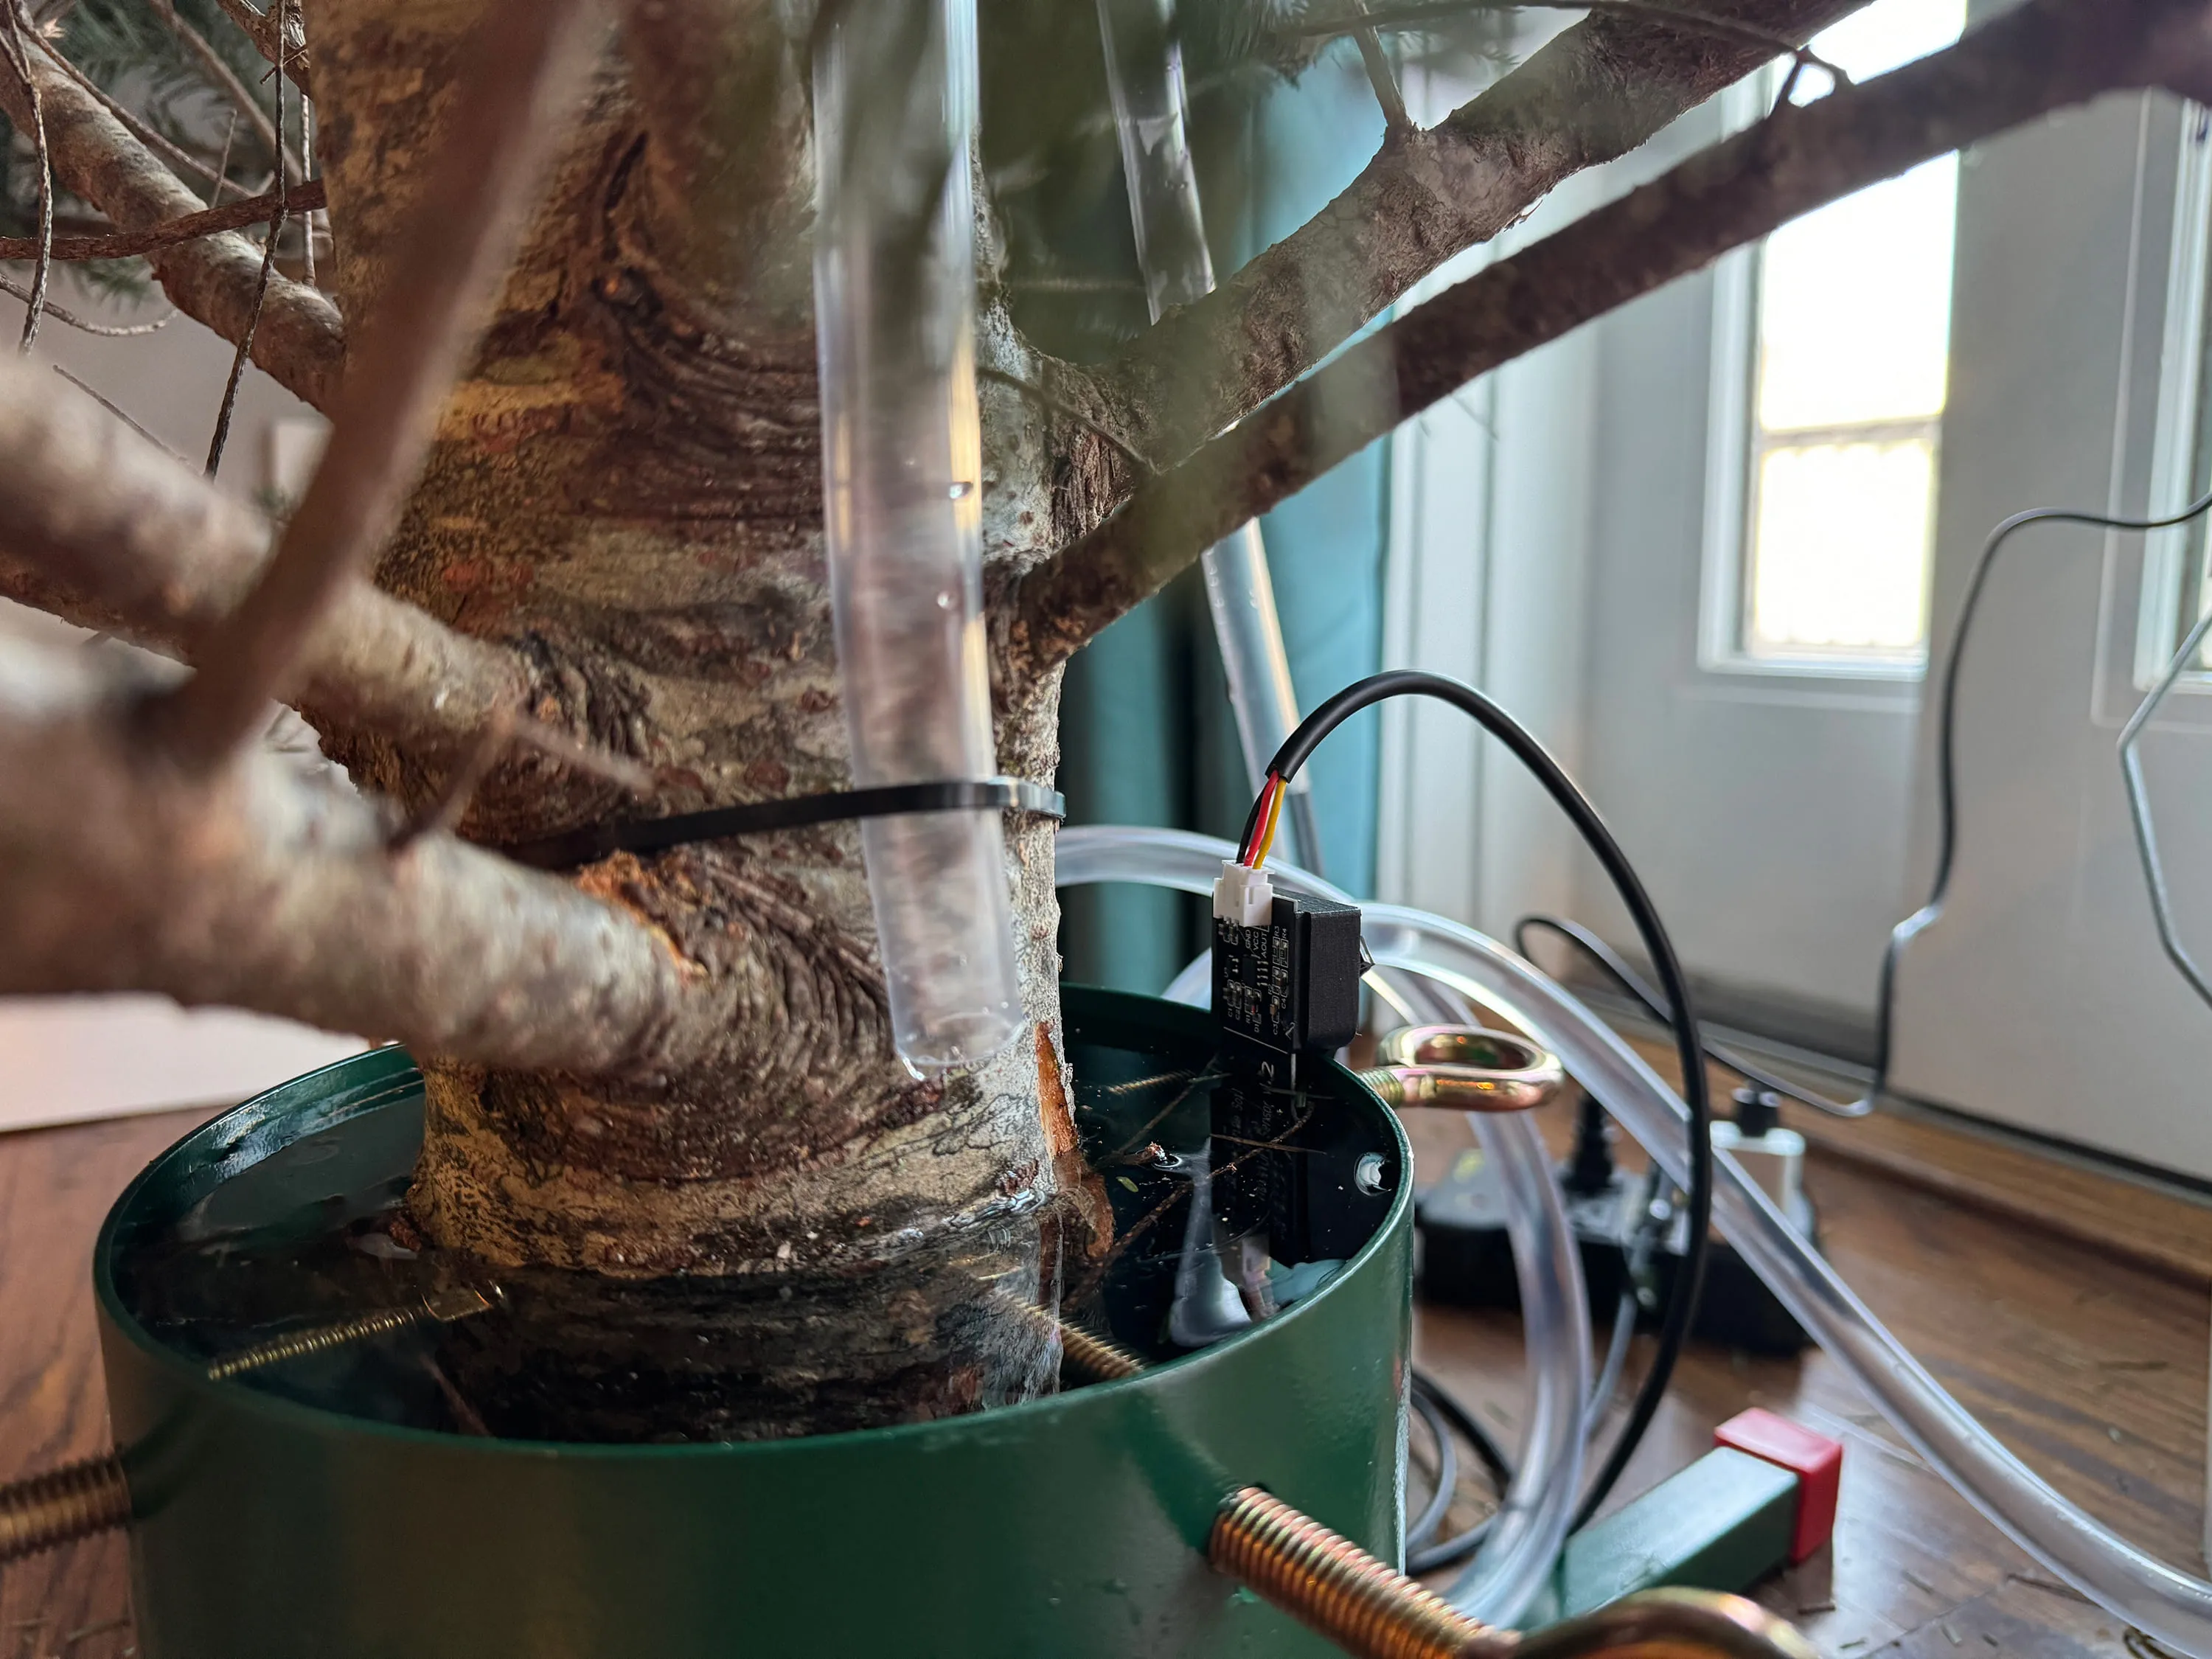
I used a zip tie to secure the vinyl tubing around the base of the tree. I also looped the tubing above a branch higher than the bucket’s water level to prevent any siphoning from happening.
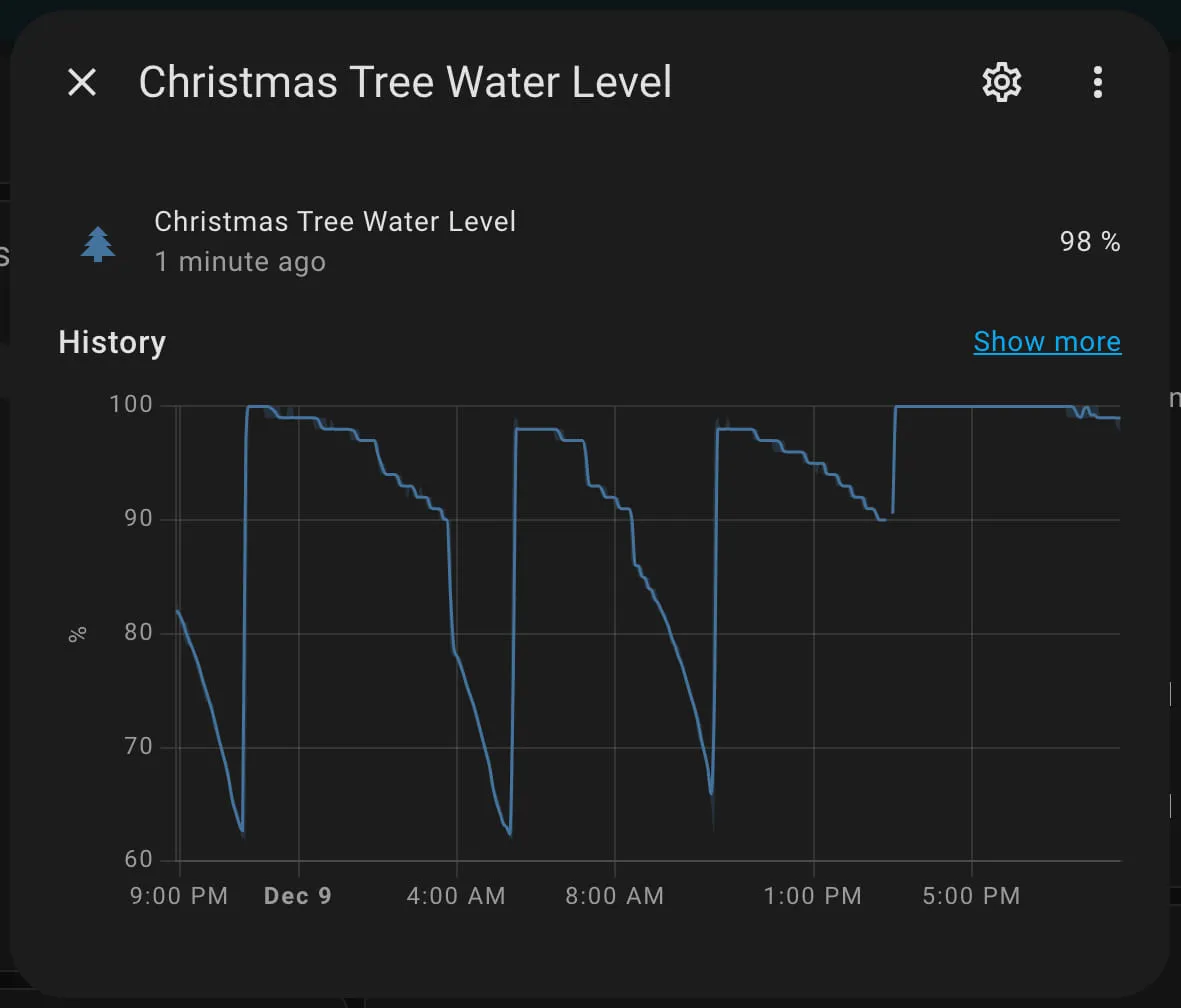
At the time of writing, the setup has been running without issue for a few days. As you can see below, the water level slowly drops below the 62% threshold, and the pump turns on, fills up, and then turns off. There haven’t been any spills or overflows yet. I’m happy so far, but it’s still too soon to say if this will work long-term or if spending the $100 on the watering system from Amazon is the way to go.
Found the above useful? Have a question? Thought of something I didn't?
Consider leaving a comment below or send me an email at johnzanussi@gmail.com.
You can also buy me a coffee. Cheers!

Comments