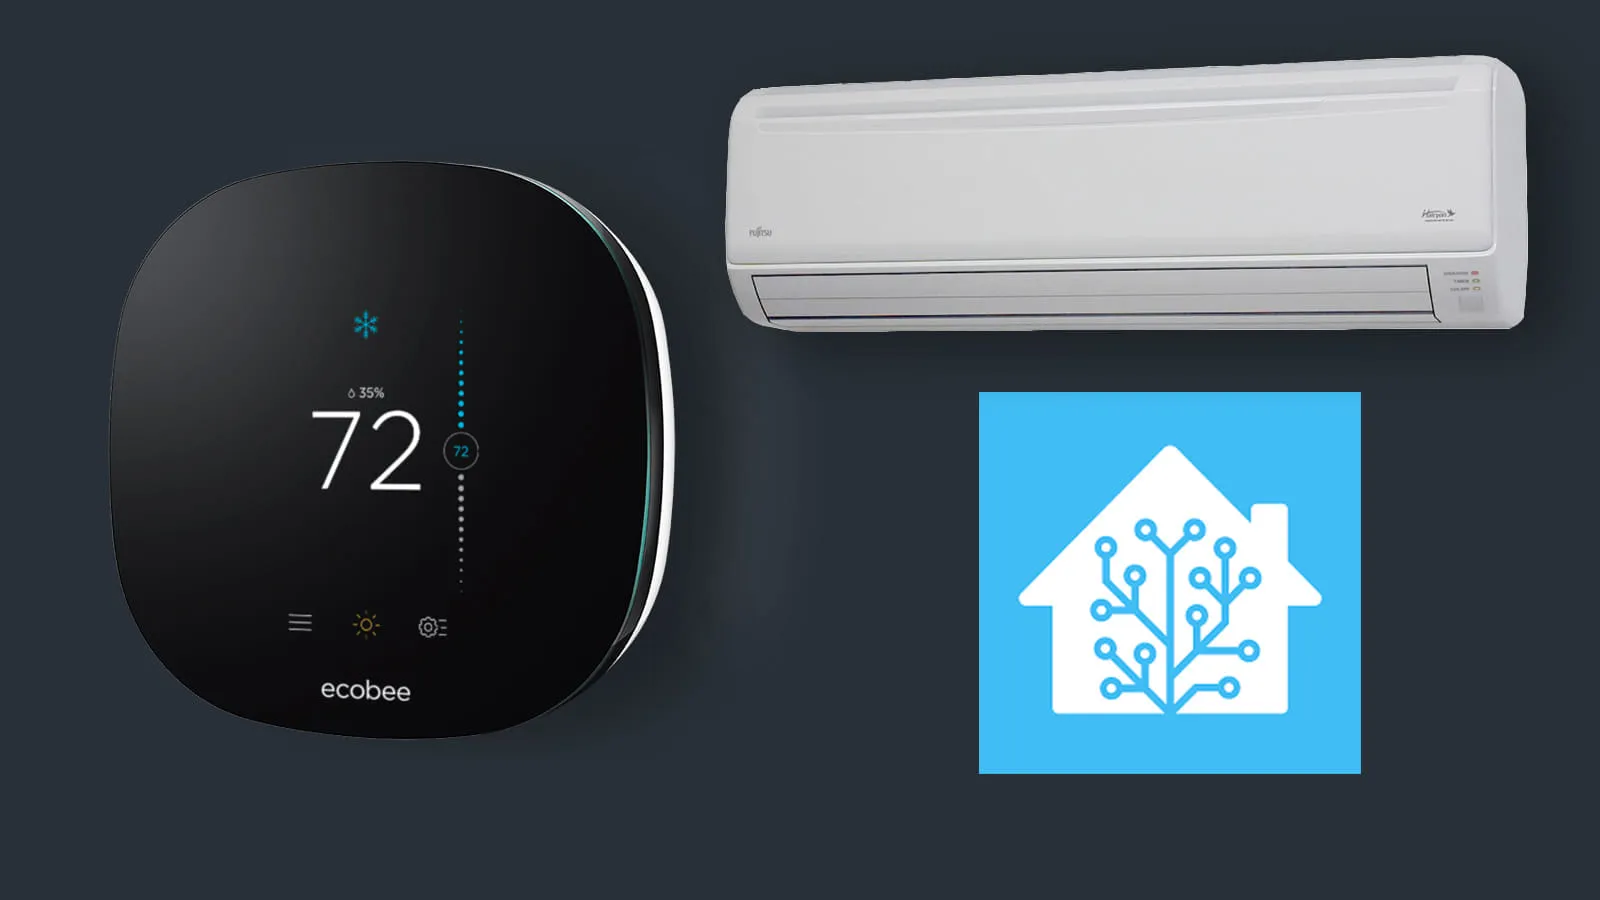
Tricking an Ecobee Thermostat to Wirelessly Control Mini Split Unit Without Any Wiring
🗓️ • ⏱️ 8 min read
🗓️ • ⏱️ 8 min read
Last year we had a mini split system installed on the first floor of our house. While the units do produce heat (and we used them a bit in the winter) we mainly use them in the warmer months to keep the house cool. The installers left us with two options to control the mini split units: individual IR remotes and an app via Mitsubishi’s kumo cloud. While this is an okay solution I’ve spent the last year or so trying to figure out a way to control the units via the existing ecobee3 thermostat we have installed for our heating system.
Had I given this some thought before having the system installed I would have realized that Mitsubishi sells a Thermostat Interface adapter (Model PAC-US444CN-1) that connects the mini split system to any thermostat via a traditional wired connection. However, now that the install is complete it would be a bit of work to get these units installed and wired to my thermostat. It’s not impossible though so I’ve kept it as a backup solution.
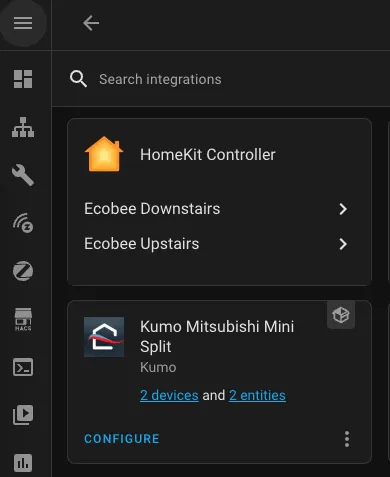
I use Home Assistant to control the IoT devices in my home. I prefer local control when I can so I was happy to learn that HA can locally control both ecobee thermostats via HomeKit Controller integration and Mitsubishi unit’s via the kumo cloud integration. This has kept the hope alive that there might be a way to control the mini split from the physical thermostat on the wall.
I searched and searched and couldn’t find any possible solutions. During the colder winter months I’d think about it from time to time but I would never spend much time on it. Now that we’re into the warmer months and we’re using the mini split I have been thinking about it a lot. Then last week I found the solution I was looking for while randomly watching a Linus Tech Tips video. Turns out they were trying to solve the same exact problem I was and with similar hardware: an ecobee thermostat + Home Assistant + Mini Split.
Here’s a clip from the video that set me down the solution path. While they don’t go into any detail about how they got it working it did lead me to figuring it out on my own.
Leading up to figuring this all out I had the following goals in mind.
As mentioned above I’m using the Mitsubishi Kumo Cloud HACS integration to locally control the mini split system and I’ve added the ecobee thermostat via the HomeKit Controller integration which also provides local control.
I’m also going to be using Node-RED to tie everything together but I suppose you could use HA’s native automations for this as well. Both the ecobee and the mini split unit are exposed as climate integrations in Home Assistant.
ecobee thermostats will do a good job of detecting which wires are connected but it also allows you to manually override via the settings menu. This is the key piece of information I got from the LTT video.
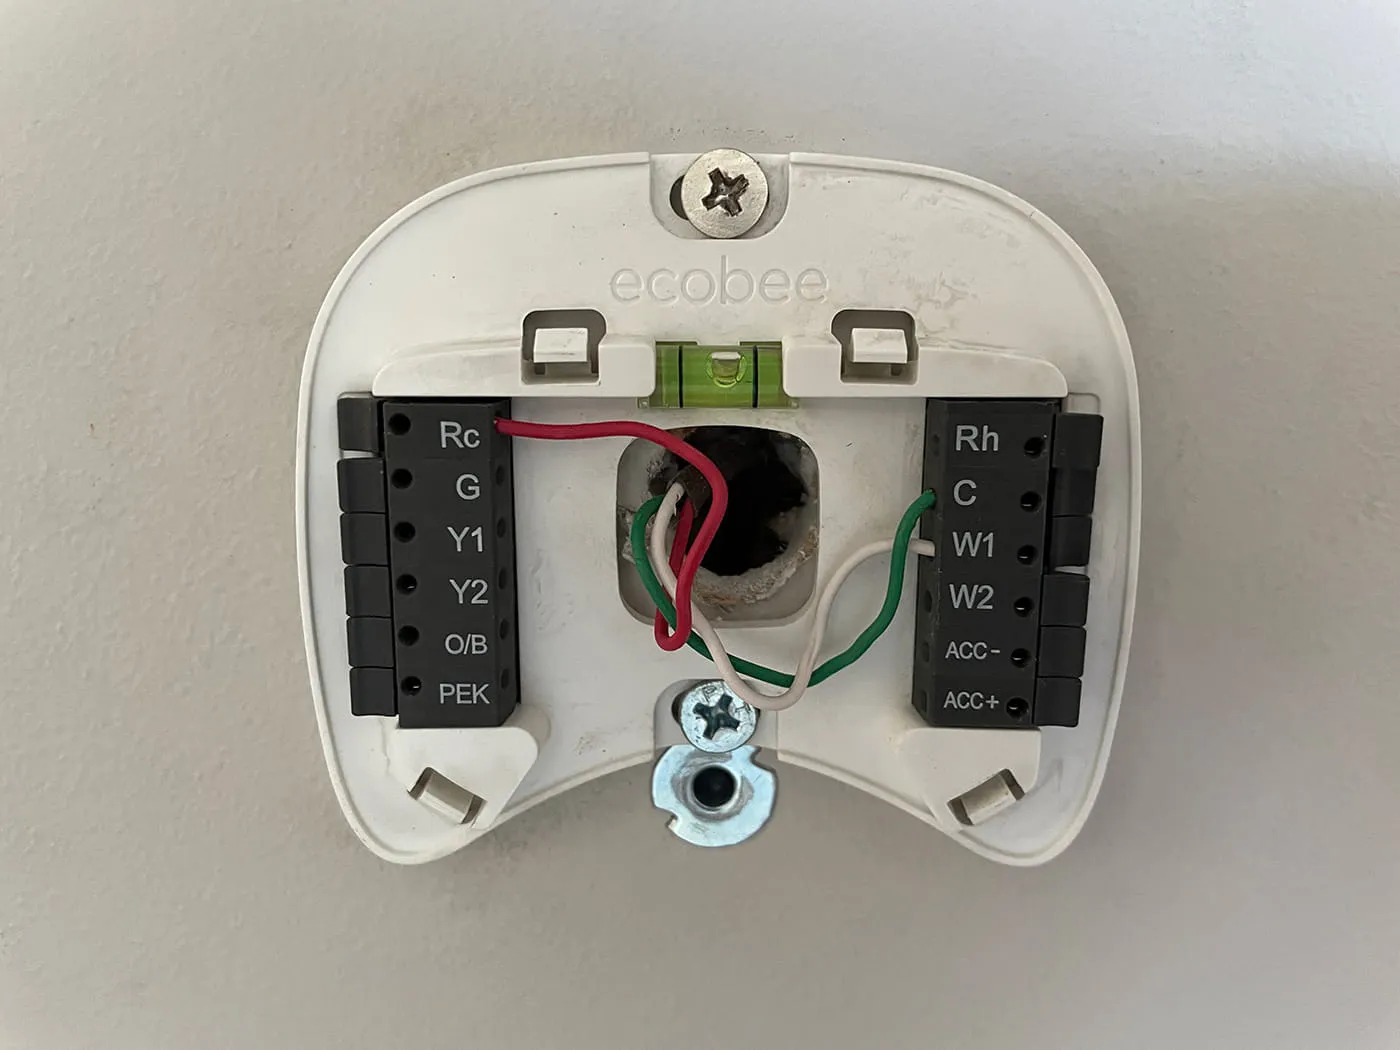
For my install I had, and still only have, three wires connected for my heating system.
However I was able to trick the thermostat into thinking there is an AC unit connected by completing the following steps.
1. From the main screen tap the 3 bars at the bottom left to enter the menu screen
2. Scroll down and tap Settings
3. Tap “Installation Settings”
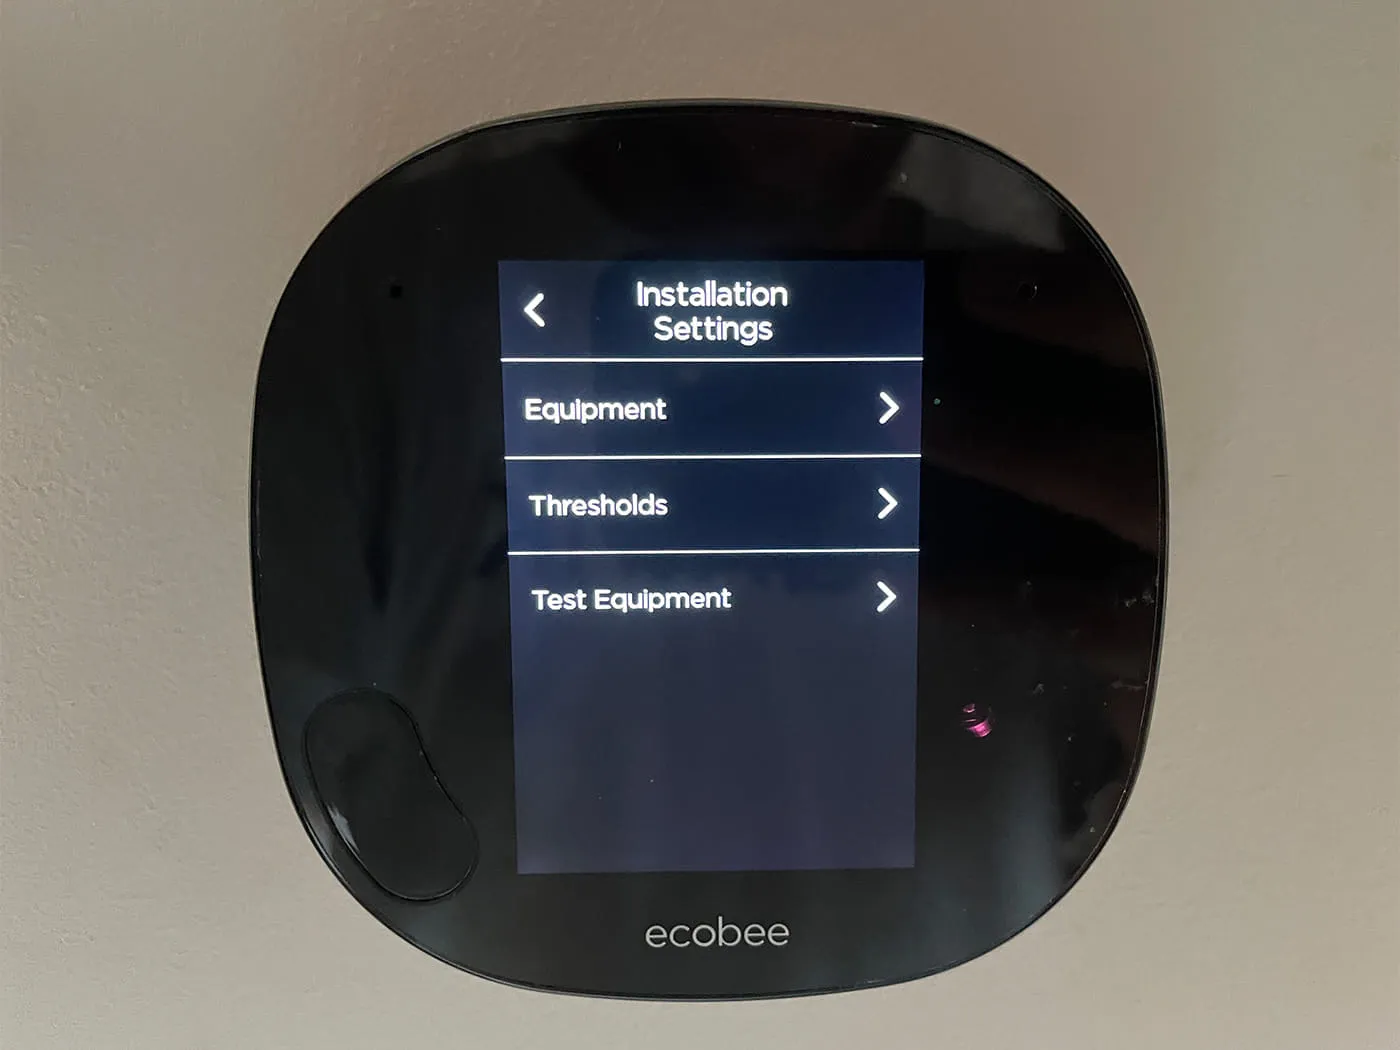
4. Tap “Equipment”
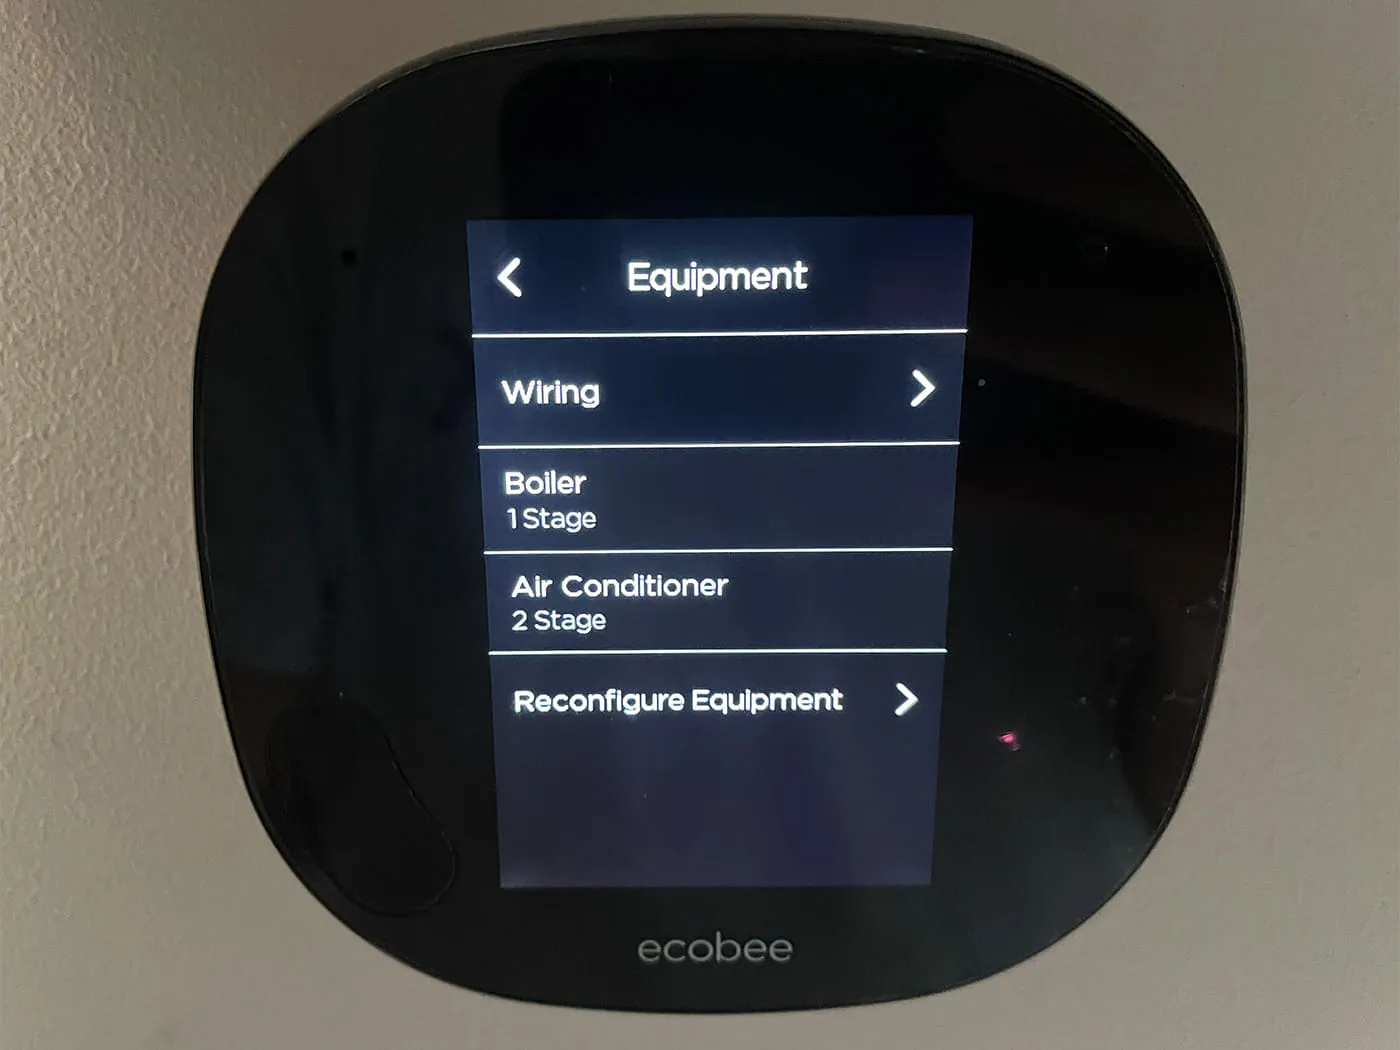
5. Tap “Reconfigure Equipment”
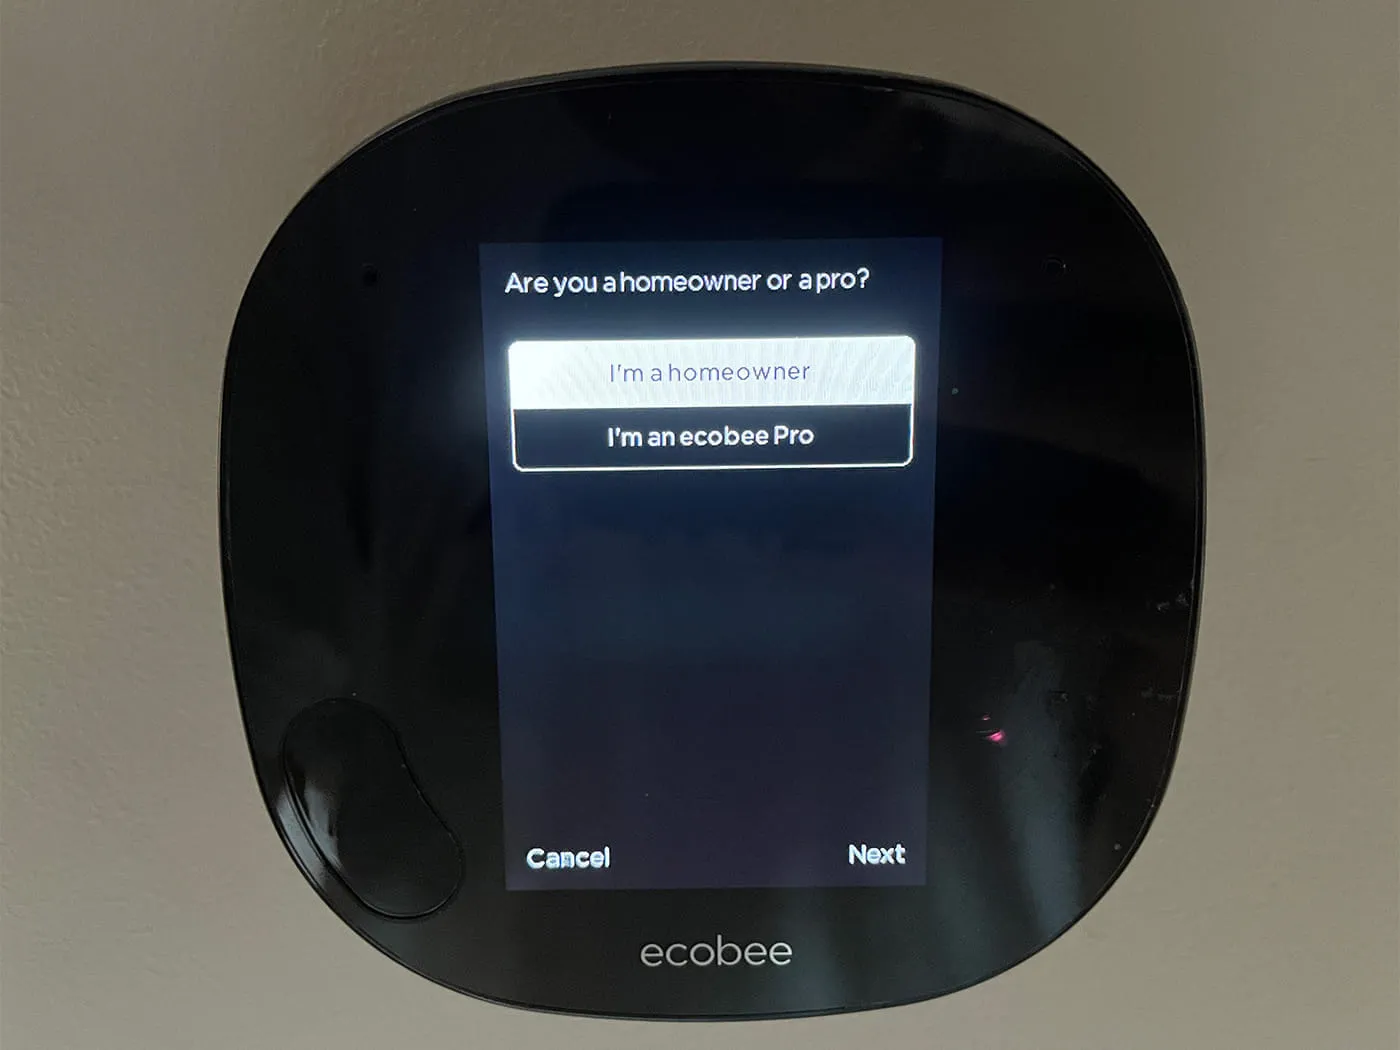
6. Select “I’m a homeowner” and tap “Next”
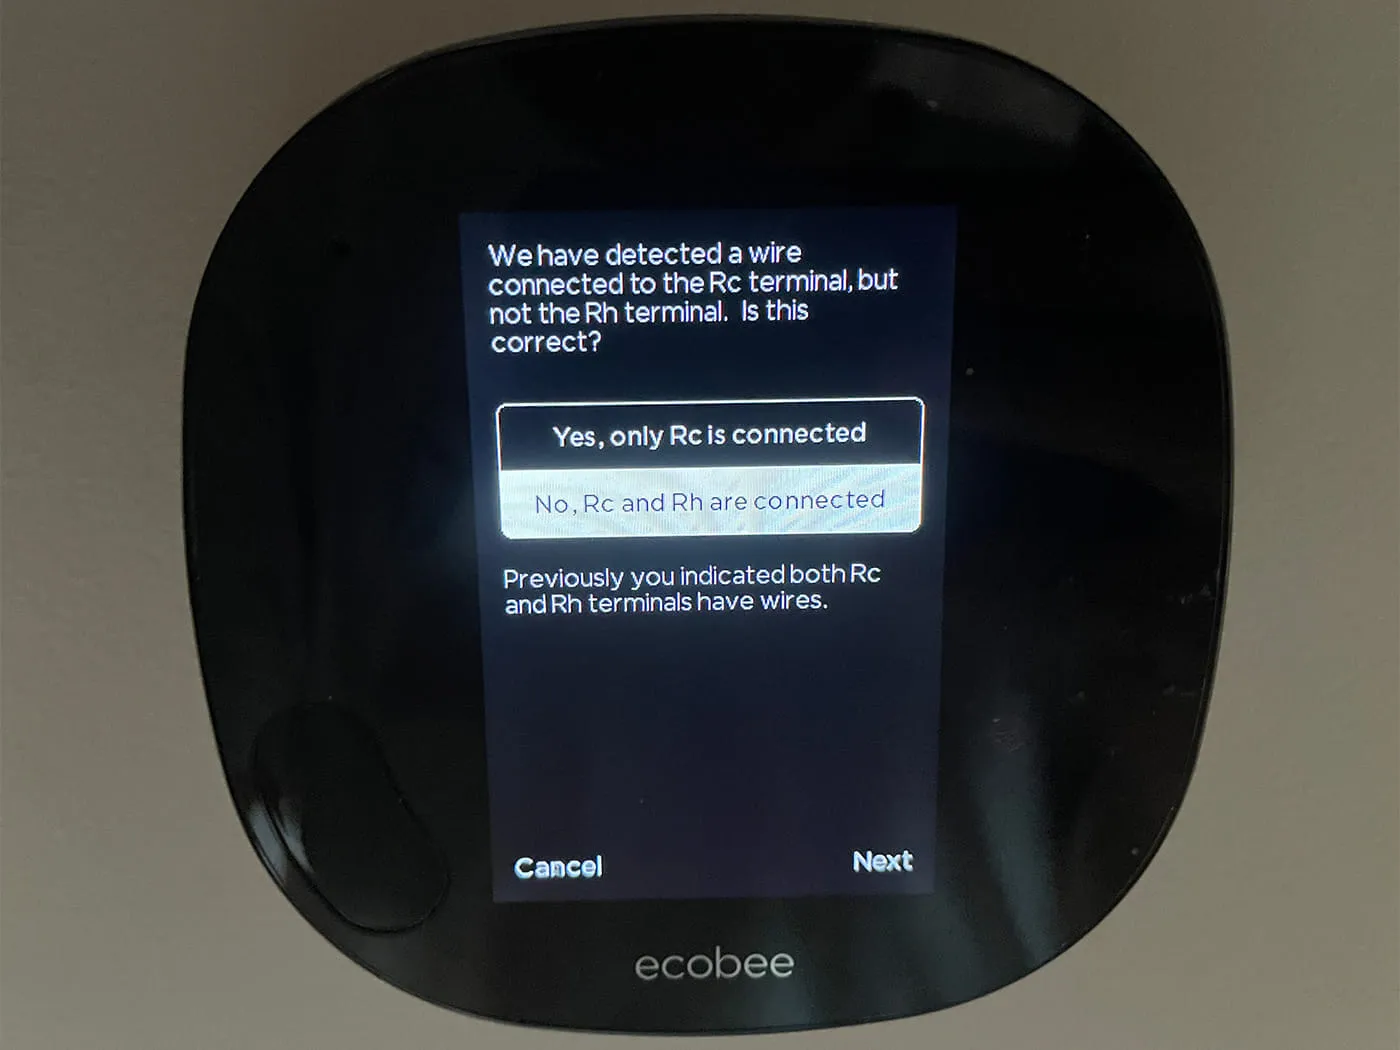
7. Select “No, Rc and Rh are connected” and tap “Next”
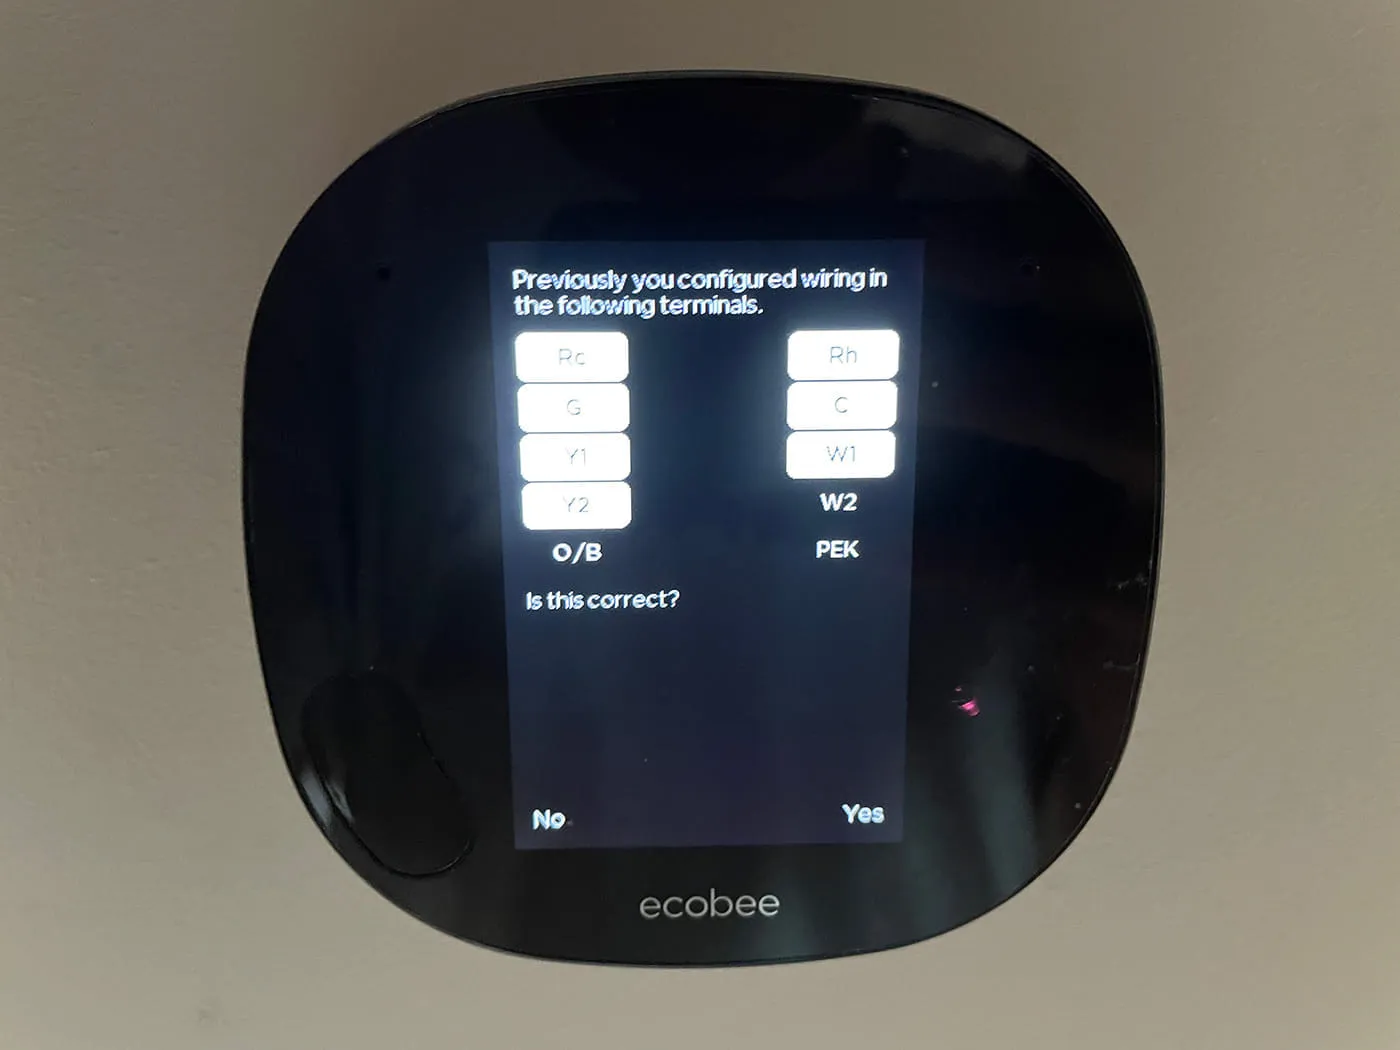
8. A diagram showing which wiring terminals are configured should be visible with the question “Is this correct?”. Tap “No”.
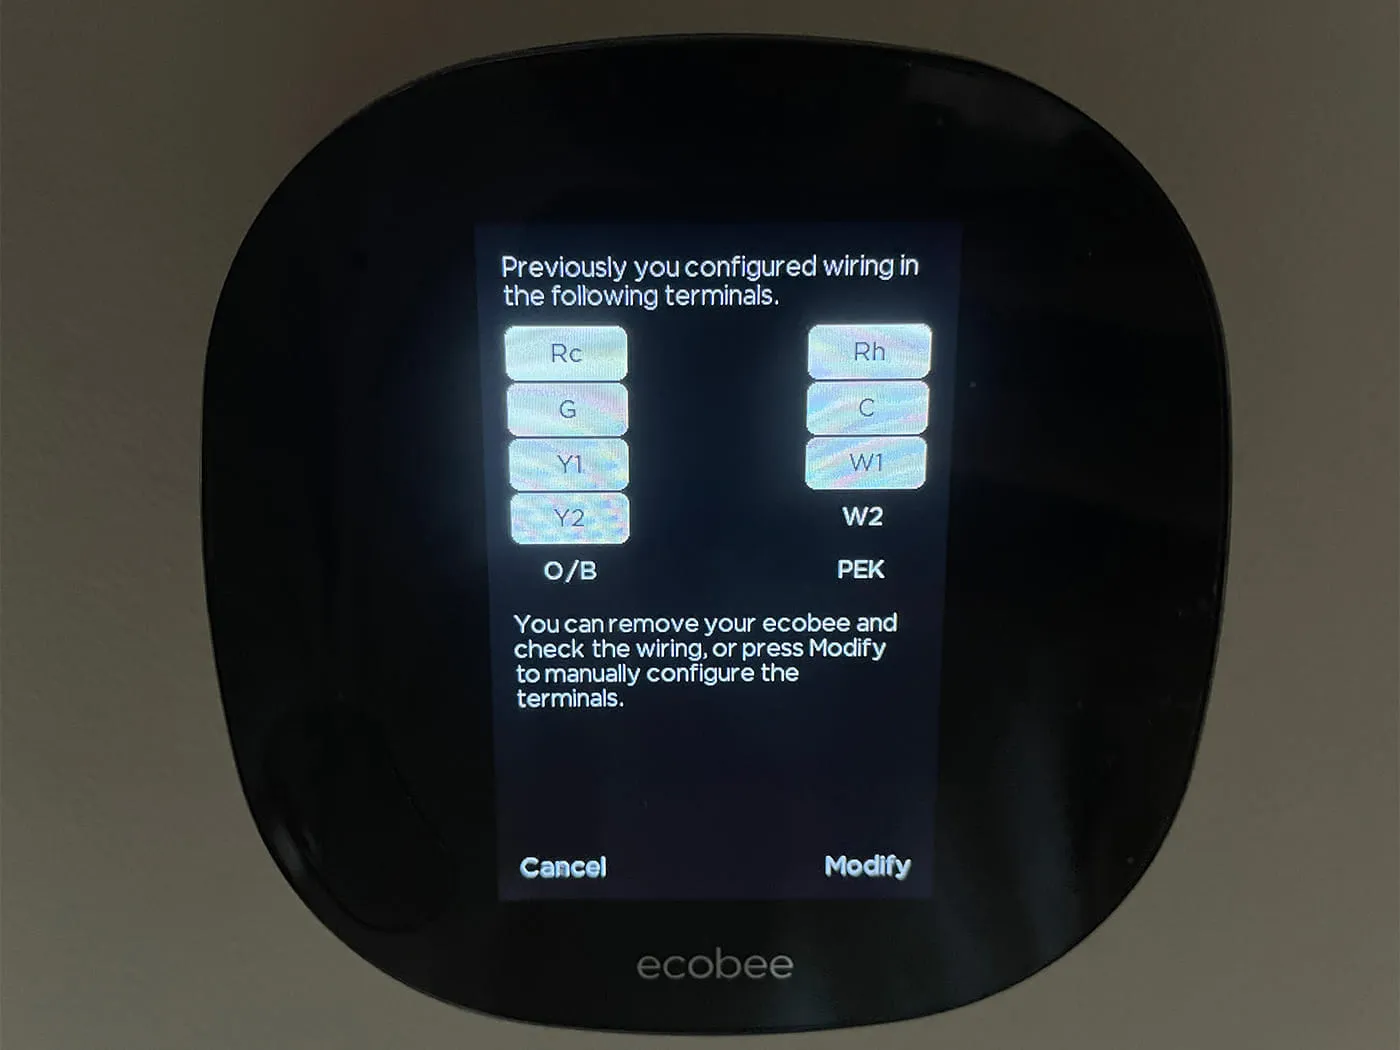
9. A similar diagram will display telling you to remove your ecobee and check the wiring or press Modify should be visible. Tap “Modify”

10. You should now see a screen that allows you to select which terminals you want to activate. In my case, I selected G, Y1, Y2, and W1. Tap “Next”.
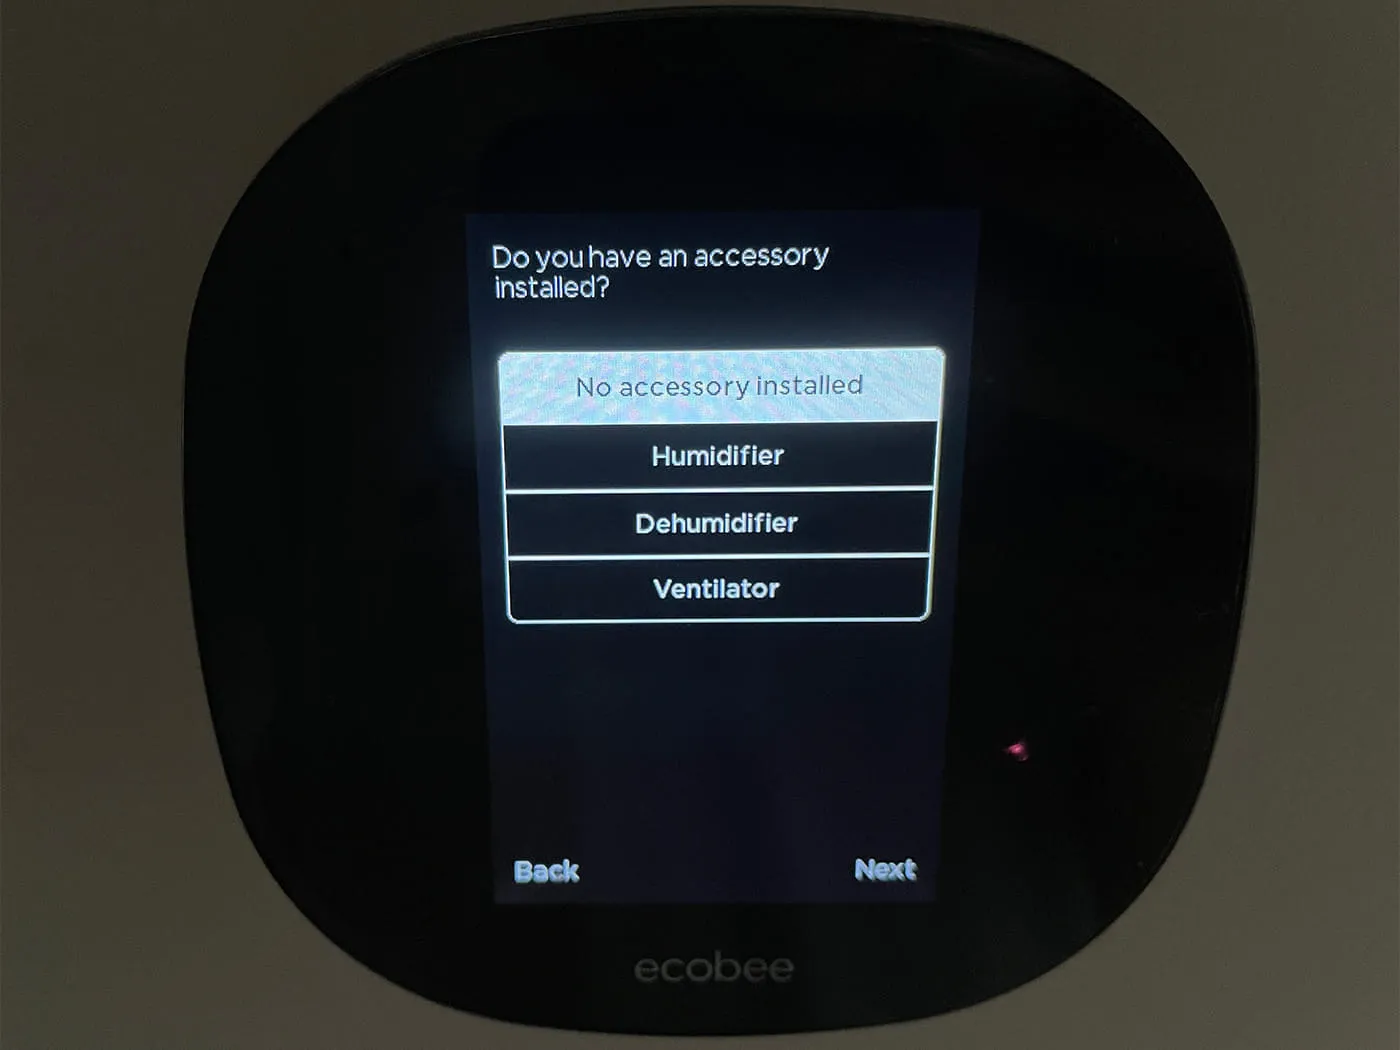
11. On the next screen select “No accessory installed” and tap “Next”.
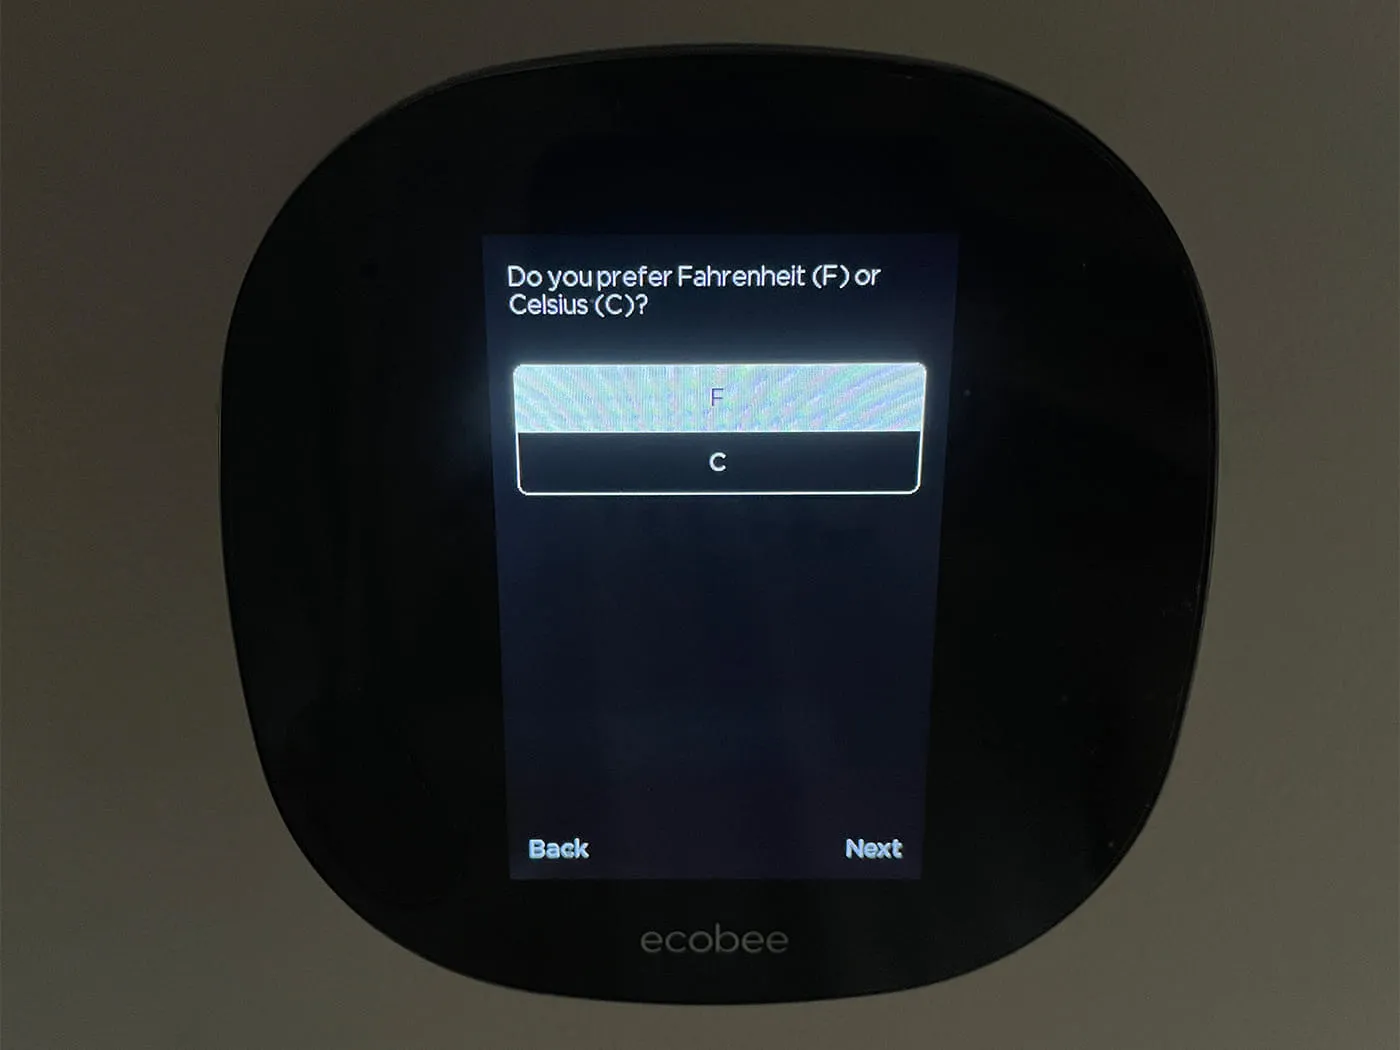
12. Select your temperature scale “F” or “C” and tap “Next”.
Your ecobee should now support cooling mode without actually being wired for it.
I started with the following on my whiteboard to get my head around what I needed Node-RED to do.
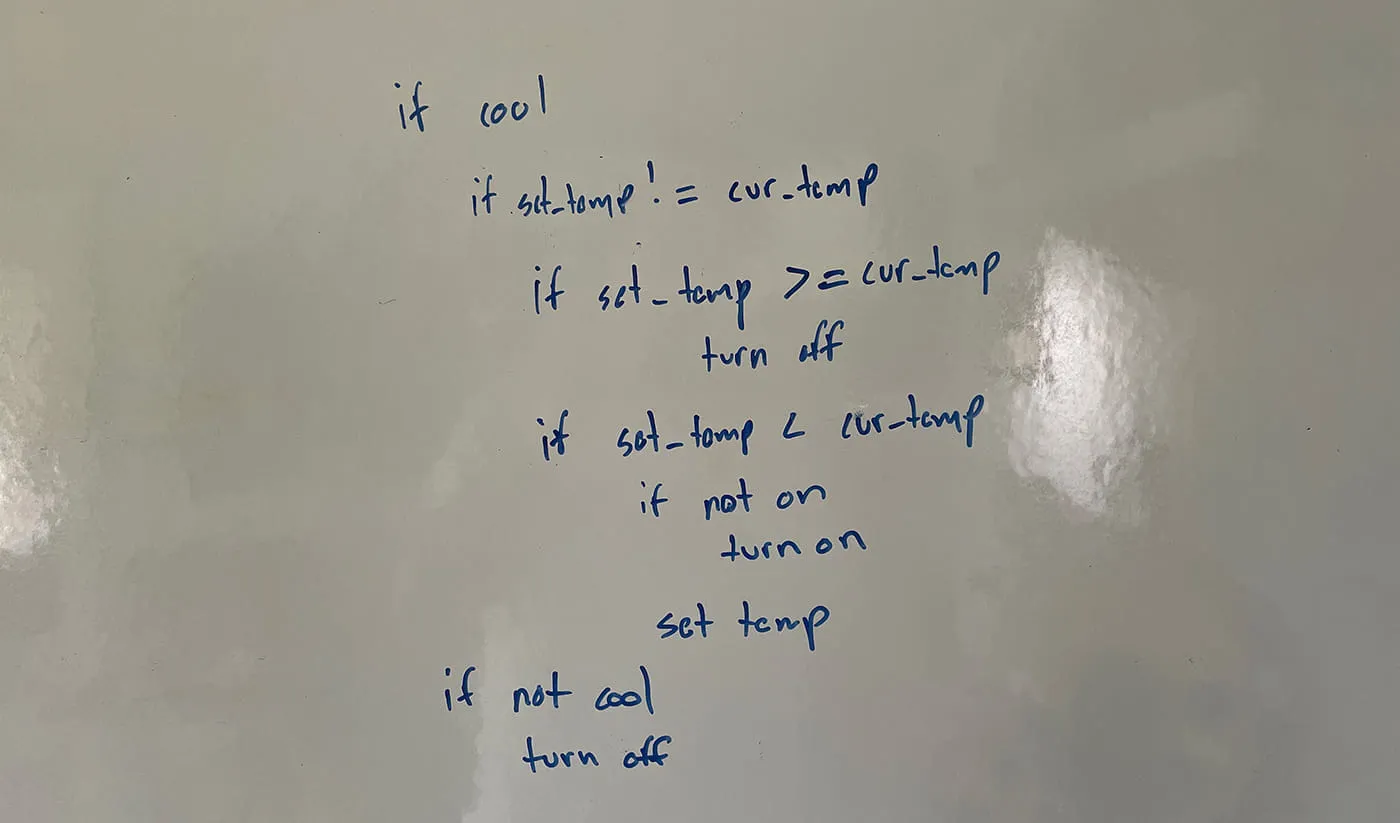
If the mode is cool and the set temperature is less than the current temperature then turn the mini split on and set the temperature.
If the mode is cool and the set temperature is greater or equal to the current temperature then turn the mini split off.
If the mode is not cool then turn the mini split off.
I then turned that into the following flow in Node-RED.
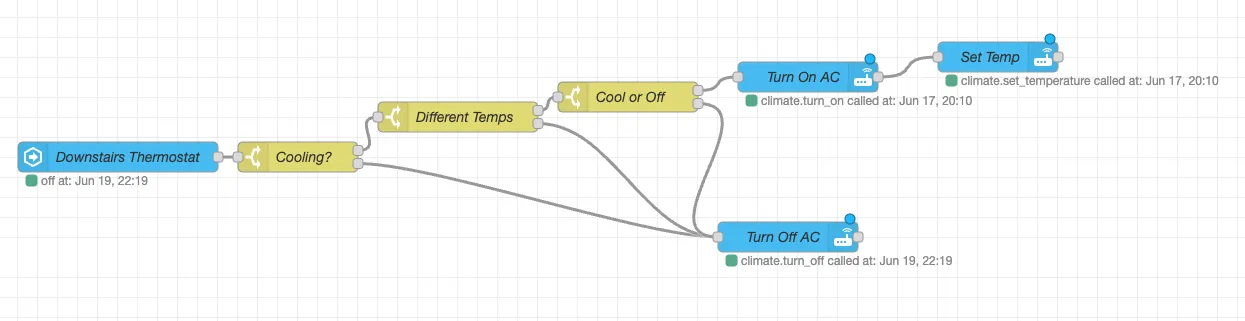
I’ll walk through each node in the flow.

The first node in the flow is the events: state node that listens for changes to the ecobee thermostat.
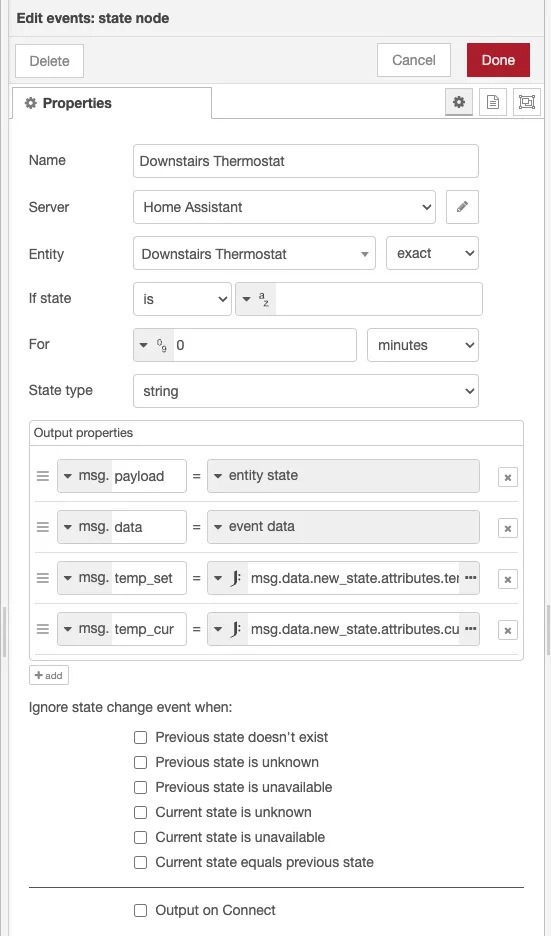
I’ve modified the output to provide the set temp and the current temp as values on the msg object.
msg.temp_set = msg.data.new_state.attributes.temperaturemsg.temp_cur = msg.data.new_state.attributes.current_temperature
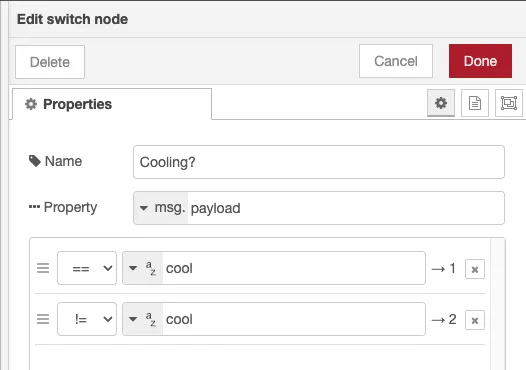
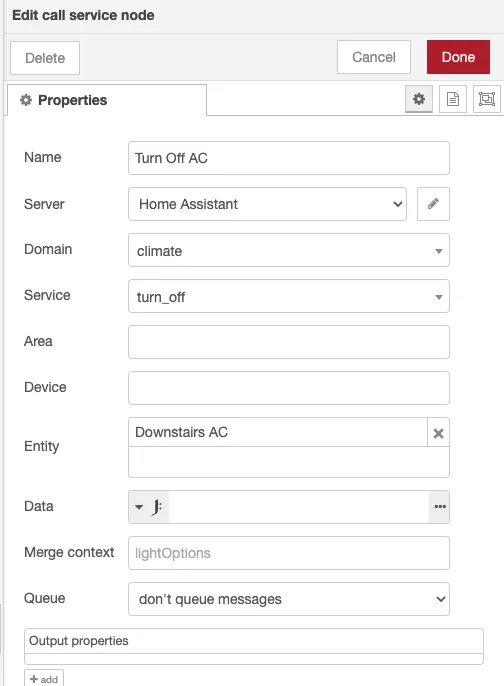
The second node is a switch that creates two outputs depending on if the state of the thermostat is “cool” or not. If the state is “cool” we move on to the next “Different Temps” . If the state is not cool we move to the “Turn Off AC” node which makes a service call to climate.turn_off to the mini split.

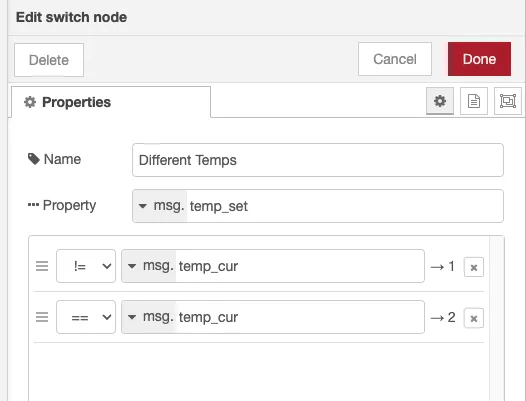
Another switch node which determines if the set temperature is different from the current temperature. If the temperatures are different we move to the “Cool or Off” node. If they are the same we move to the “Turn Off AC” node.

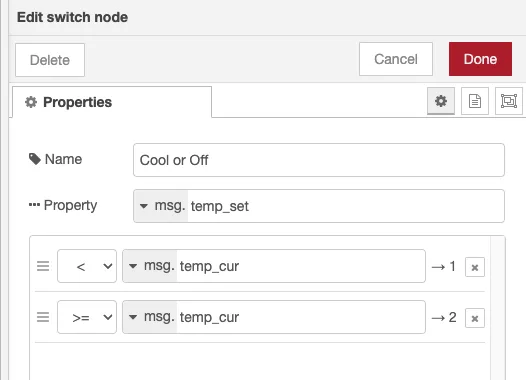
Yet another switch node that determines if the set temperature is less than the current temp or greater than or equal to the current temp. If less than, we move to the “Turn On AC” node. If greater than or equal to, we move to the “Turn Off AC” node.

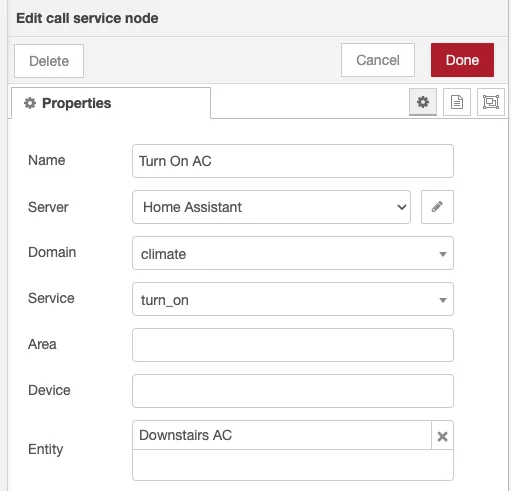
Makes a call to the climate.turn_on service for the mini split unit which, as it says, turns the mini split on.

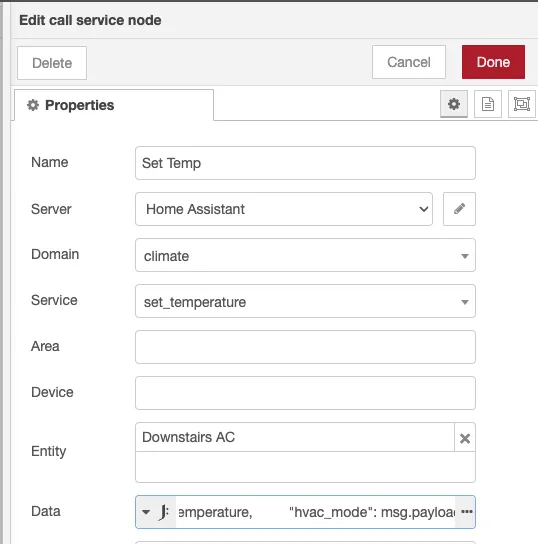
Makes a call to the climate.set_temperature service for the mini split and passes in the value from temp_set for the temperature param.

As mentioned above this node makes a call to climate.turn_off for the mini split unit and turns it off.
Here is a full export of the Node-RED flow if you want to import it and test yourself.
[{"id":"6cbf3993008e44e0","type":"tab","label":"Thermostat","disabled":false,"info":"","env":[]},{"id":"5ff805fd3a4bb696","type":"server-state-changed","z":"6cbf3993008e44e0","name":"Downstairs Thermostat","server":"2d459d37.8c31f2","version":4,"exposeToHomeAssistant":false,"haConfig":[{"property":"name","value":""},{"property":"icon","value":""}],"entityidfilter":"climate.downstairs","entityidfiltertype":"exact","outputinitially":false,"state_type":"str","haltifstate":"","halt_if_type":"str","halt_if_compare":"is","outputs":1,"output_only_on_state_change":false,"for":"0","forType":"num","forUnits":"minutes","ignorePrevStateNull":false,"ignorePrevStateUnknown":false,"ignorePrevStateUnavailable":false,"ignoreCurrentStateUnknown":false,"ignoreCurrentStateUnavailable":false,"outputProperties":[{"property":"payload","propertyType":"msg","value":"","valueType":"entityState"},{"property":"data","propertyType":"msg","value":"","valueType":"eventData"},{"property":"temp_set","propertyType":"msg","value":"msg.data.new_state.attributes.temperature","valueType":"jsonata"},{"property":"temp_cur","propertyType":"msg","value":"msg.data.new_state.attributes.current_temperature","valueType":"jsonata"}],"x":120,"y":160,"wires":[["bc8694e89b213679"]]},{"id":"6da944783d464c89","type":"api-call-service","z":"6cbf3993008e44e0","name":"Turn On AC","server":"2d459d37.8c31f2","version":5,"debugenabled":false,"domain":"climate","service":"turn_on","areaId":[],"deviceId":[],"entityId":["climate.downstairs_ac"],"data":"","dataType":"jsonata","mergeContext":"","mustacheAltTags":false,"outputProperties":[],"queue":"none","x":790,"y":80,"wires":[["14a982a258044f6d"]]},{"id":"20a7f99c6ea0efc2","type":"api-call-service","z":"6cbf3993008e44e0","name":"Turn Off AC","server":"2d459d37.8c31f2","version":5,"debugenabled":false,"domain":"climate","service":"turn_off","areaId":[],"deviceId":[],"entityId":["climate.downstairs_ac"],"data":"","dataType":"jsonata","mergeContext":"","mustacheAltTags":false,"outputProperties":[],"queue":"none","x":790,"y":180,"wires":[[]]},{"id":"14a982a258044f6d","type":"api-call-service","z":"6cbf3993008e44e0","name":"Set Temp","server":"2d459d37.8c31f2","version":5,"debugenabled":false,"domain":"climate","service":"set_temperature","areaId":[],"deviceId":[],"entityId":["climate.front_room","climate.living_room"],"data":"{\t \"temperature\": msg.data.new_state.attributes.temperature,\t \"hvac_mode\": msg.payload\t}","dataType":"jsonata","mergeContext":"","mustacheAltTags":false,"outputProperties":[],"queue":"none","x":960,"y":60,"wires":[[]]},{"id":"bc8694e89b213679","type":"switch","z":"6cbf3993008e44e0","name":"Cooling?","property":"payload","propertyType":"msg","rules":[{"t":"eq","v":"cool","vt":"str"},{"t":"neq","v":"cool","vt":"str"}],"checkall":"true","repair":false,"outputs":2,"x":300,"y":160,"wires":[["1b6dc52f04ef6805"],["20a7f99c6ea0efc2"]]},{"id":"1b6dc52f04ef6805","type":"switch","z":"6cbf3993008e44e0","name":"Different Temps","property":"temp_set","propertyType":"msg","rules":[{"t":"neq","v":"temp_cur","vt":"msg"},{"t":"eq","v":"temp_cur","vt":"msg"}],"checkall":"true","repair":false,"outputs":2,"x":460,"y":120,"wires":[["bf72658acb9e3113"],["20a7f99c6ea0efc2"]]},{"id":"bf72658acb9e3113","type":"switch","z":"6cbf3993008e44e0","name":"Cool or Off","property":"temp_set","propertyType":"msg","rules":[{"t":"lt","v":"temp_cur","vt":"msg"},{"t":"gte","v":"temp_cur","vt":"msg"}],"checkall":"true","repair":false,"outputs":2,"x":630,"y":100,"wires":[["6da944783d464c89"],["20a7f99c6ea0efc2"]]},{"id":"2d459d37.8c31f2","type":"server","name":"Home Assistant","version":2,"addon":true,"rejectUnauthorizedCerts":true,"ha_boolean":"y|yes|true|on|home|open","connectionDelay":true,"cacheJson":true,"heartbeat":false,"heartbeatInterval":30}]As you can see in the video below this solution works great. There’s only about a 3 second delay between setting the temperature at the thermostat and the mini split unit reacting.
Let’s see how we did with the goals from above.
Setting a cool temperature at the thermostat sucessfully controls the mini split unit.
Using the kumo cloud and HomeKit integrations Home Assistant is able to receive updates from the ecobee thermostat and send commands to the mini split units all over the local network without having to rely on a cloud service.
Instead of keeping track of and fumbling with remotes or Apple’s Home app my wife can control the air conditioning how she has been doing with the heat for as long as we’ve been using the ecobee.
We’ve been using it for a couple weeks now and I’ve yet to run into any issues. If you’ve been looking to solve a similar situation and this helped you out be sure to let me know in the comments. Or if you have any ideas on how to improve this setup I’m happy to hear them. Also please let me know if you have any questions. I’m happy to try to help out.
Found the above useful? Have a question? Thought of something I didn't?
Consider leaving a comment below or send me an email at johnzanussi@gmail.com.
You can also buy me a coffee. Cheers!

Comments